Sunday

The Stylish Blogger Award

Friday I was pleasantly surprised with a Stylish Blogger Award from Pamela of Becolorful http://becolorful.typepad.com/ Although, Pamela and I are new admirers of each other’s work we are like kindred spirits, both in love with color and funky designs.


So, I was honored when she passed on this award to me, but along with this wonderful award comes the task of coming up with 7 things that are interesting about me! LOL! Now…although, I’d love for all of you to think I live this fabulously exotic, artistically filled, culturally charged life, I’m afraid I don’t. Oh, my life is extremely busy, some days it’s practically insane, but interesting? Hmmmm….

Well, here are the 7 things I could come up with! Hold onto your hats, and have a seat, you my friends are in for a crazy ride….Here we go!

1. I have 5 kids! Yep, you heard me 5! They range in age from 24-13 (2 boys/3girls) You can read all about us in our other blog http://2moms5kids.blogspot.com/ I started writing the blog in order to keep track of all the craziness that goes on in our life, and boy does it get crazy! Actually we should have a reality TV show…Not to be full of myself, but you’d tune in, you really would! We’re that crazy!

2. I love to write! Four years ago I completely finished my first romance novel Vanilla Summer. Its 34 chapters and I loved writing it. It’s partially based on my own life. I think we all have a book inside of us, we just need to get it out on paper! Now, trying to find an agent that’s been the hardest part of the process. I’m also working on a poetry book with my 13 yo., (Mom, Me & Poetry ) she writes amazing poetry and I’m doing the illustrations to go along with it. I’m also pitching another book on, you guessed it, redoing furniture! In the mean time these blogs plus our other business blog keep me writing weekly!

3. My formal education… Although I have an AS in Art, my BS is actually in Psychology/Special Education. I spent very little time in a classroom though, because just after I finished up my education Maggie and I started our 1st business. (That $40,000 degree actually helped me navigate the special education system for my own children though, so it wasn’t a total wash, LOL!)


4. I collect a lot of things. My two favorites are Crosses and Hello Kitty. Hello Kitty speaks to the little girl in me, the crosses are beautiful & symbolic. My kids think its creepy.


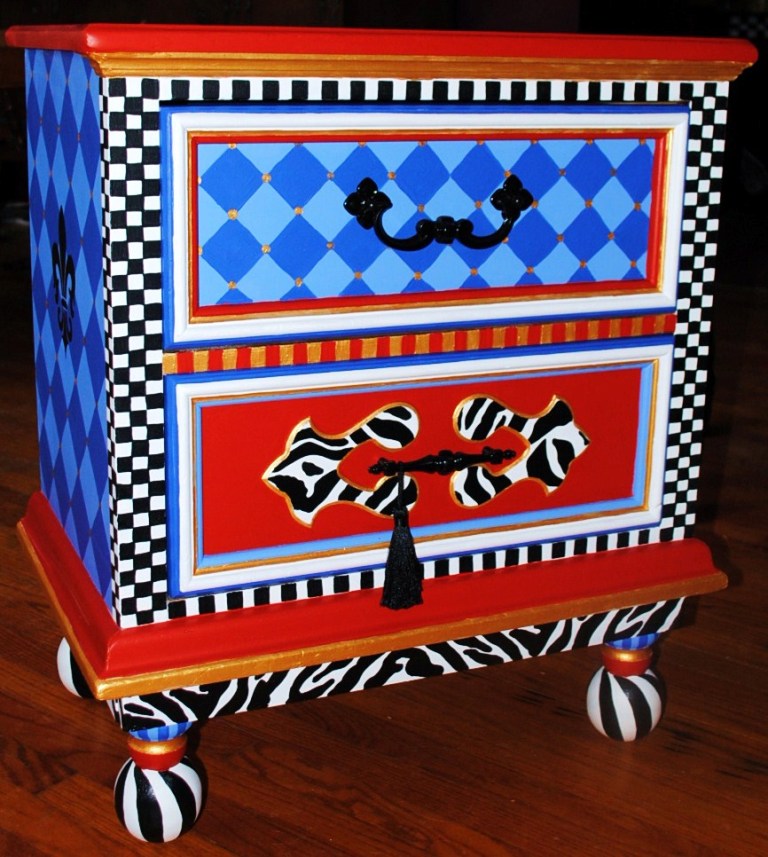
5. I’ve started 2 businesses from scratch. 2 Women and a Paintbrush http://2womenandapaintbrush.blogspot.com/was started in 2003 and has raised a family of 7 which in today’s economy, ROCKS! We are women owned and operated which says a lot, since this particular area of work is pretty much dominated by men, but Maggie and I hold our own! We have learned a lot, met a lot of great people and have grown both professionally and personally in so many ways. The Decorative Paintbrush is our love child :D

6. I’m addicted to tattoos! I have 3 (getting my 4th in a couple weeks)! Although I am not brave enough to do a whole sleeve or anything like that, I love little, personal ones. Ones that show up all over the place when you least expect them. You know the kind, on a wrist, behind the ear. I believe they should be personal too, have meaning. The one on my wrist: Kanji symbols for artist. One on my ankle: My favorite bible verse 1 Cor 13:8 “Love Never Fails", I got it for my middle daughter, when we were going through some struggles. Then the one on my arm that symbolizes the 2 most important things in my life: Faith & Family. My fourth one will be on the back of my neck: hearts with wings and “te voglio bene” underneath, which my grandmother used to say to me “I love you” in Italian. I always put the wings and heart on all my furniture too, because it reminds me of her, it’s symbolic for me, she was a great lady.

7. And finally number seven…..I HATE rude people! HATE, HATE, HATE! There is just no reason for it. I have such a low tolerance for rudeness and ignorance; it would blow your mind! LOL! Not that I’m Ms. Susie Sunshine, Rose Colored Glasses Lady, cause I can be as ornery as the rest of ya, but I just think that this world is awful enough on its own , and if we just tried a little bit harder, to be just a little bit nicer, things might be just a little bit better…are you feeling me people :D

Okay, so that’s my service announcement part of the quest!

So, remember to stop by and see Pamela @ http://becolorful.typepad.com/ then make your way over to these 10 fabulous people! I will be bestowing this wonderful award onto them next. Please, if you get a chance check them out, you'll be doing yourself a favor. Some you may have seen before, some you may have not, but they are all worthy of your LOVE! LOL! Later, everybody!

http://2womenandapaintbrush.blogspot.com/Maggie gives great tips, before and after pictures on the redoings (is that a word?) of people's homes!

http://chrissiegrace.blogspot.com/ Chrissie has fantastic, colorful signs, that you will just love! Her book is outstanding and a must have!

http://myrepurposedlife.blogspot.com/ Gail is amazing! Always posting something new! I'm sure you've all heard of her!

http://rasjacobson.wordpress.com/ This blog, although not a craft blog is a wondeful advice blog on school, parenting and teaching. Renee is a dear friend and a wonderful teacher you'll enjoy her stuff!

http://burlapluxe.blogspot.com/ Although my work is wild and colorful, I do have a softer side and secretly love washed out whites and romantic fabrics. This blog speaks to that.

http://chrissiescollections.blogspot.com/ Chrissie does really great things with once loved furniture too!

http://www.junkrestore.com/ Great blog! Fun & funky ideas for vintage stuff!

http://www.inthefunlane.com/ You knew I'd have a lot of furniture redo blogs right! These guys have some really fresh ideas to take a look at.

http://somedaycrafts.blogspot.com/ Oodles and Oodles of amazing craft ideas

http://mollysusanstrong.blogspot.com/ Okay, one more amazing furniture artist!

Wednesday

Where Do You Find Inspiration?

MacKenzie-Childs Chair
Over the years people have told me that my work reminds them of MacKenzie-Childs. Now, I take great pride in that, because their work is amazing, and to even be remotely thought of, even in the same sentence, is hugely complementary.


Every month the catalog comes to my house and I devour it, cover to cover, absorbing it like some type of junkie trying to get a fix. This time around I was inspired by this beautifully overstuffed chair and it’s blue on blue harlequin pattern. Now, I can paint, but I CAN NOT reupholster, so I decided to use this piece as inspiration for an end table that had been marinating in the studio for awhile.

Before we begin, I want to let you guys in on a little secret; I really don’t consider myself an artist per say, not in the traditional sense of the word. What I do on furniture, anybody can do. My patterns are simple. I cheat, a lot. I use stencils and transfer paper to draw (although I could do it free hand if I wanted, it’s just easier to grab a stencil, draw it on and color it in like a big coloring book) and I use embellishments to pump up my pieces (wooden cutouts). I’m more of a Creative Organizer. I know how to mix patterns up, put them together and make them look somewhat decent. But what I’m thinking, is this…I can teach you how to do it too! It really isn’t that hard! So, let’s just start with this piece and go from there, I’ll have you painting funky pieces in no time!

Step one: Prep Work  I know, we discussed this before, if there was a way to skip prep work, yours truly would be all over it!

Remove hardware. I decided to keep it and reuse it for this piece, just because it was so unique and fit the piece so precisely.


The beautiful dog in this picture decided she wanted to use the corners as a chew toy so Maggie had to fill it with wood putty (a couple times) and sand it back to its original shape. She uses Zar Wood Patch. (Although it says it takes stain, it doesn’t, so if you’re planning on staining your piece after applying it, don’t, because it doesn’t match up, but if you are painting it works great). It dries as hard as real wood, it’s wonderful.


Then I had to sand the entire piece. I use an electric sander on the larger areas and a smaller individual low grade sheet on the more detailed areas.

Then we prime. I primed the entire piece in two coats of an acrylic based primer. You could use an oil based primer, for best results, but personally, I hate the clean-up, and acrylic works just as good.


Step Two: Base Coating  Base coating to me is still a tedious job! Yay, sure, it’s fun to see the colors going on, you start to get a vision for the finished piece but mainly it’s BORING! But good prep work and good base coating can really make or break a piece. It isn’t just the pretty work that sells, its everything, it’s a team effort. So, take the time to invest in this step (Hahaha! when Maggie reads this she’ll laugh me right out of the room! Okay, it’s no big surprise that patience isn’t my strong point, but I’m trying to be a good teacher, remember!)


It’s also important to use good products when painting. My larger brushes are all Purdy. I’ve tried so many others, believe me and Purdy is the best. Its bristles hold the paint the best, giving you a nice cut in line, with less drips. I wouldn’t use anything else. My brushes are very loved as you can see! But here’s a trick, if you put it back in its wrapper (after you have washed it out and patted it dry) it will continue to hold it’s great shape for a very long time. I use a 1.5” chiseled cut brush 95% of the time it gives me the best control.


I also, used Krylon Indoor/outdoor gloss black spray paint to spray the hardware. I don’t always reuse the hardware on my pieces but this piece would have looked silly with any other hardware, so I decided just to update it with a fresh coat of color. Krylon dries fast and is very durable. I just put the pieces on an old piece of cardboard and sprayed away.


Step Three: Pretty Work! Yep, my favorite part! But it can be yours too! Really it’s not too hard! First, remember our inspiration piece…Well, I did the sides in the blue diamonds. All I did was trace a square (from a stencil, didn’t even measure one out) cut it out, turned it on its side and drew each diamond next to each other, each tip touching the next. I knew I would have to repeat that pattern again somewhere in the piece so I did it in the drawer area. I just cut out a smaller square and did the same thing there. Remember, the corners don’t have to match up perfectly because we will go back in and where each diamond meets we will put a circle (this will cover up any lines that fall short).

Next, Zebra print! Got a great stencil, thought it would go well with this piece. I traced it on the back, around the bottom, the drawer panel and on top, and then colored it in.


Then the black and white check, which is usually included on every piece I do. Which is another reason why people find a similarity between my work and MacKenzie-Childs, although her checks are much more classier?


The ball feet were add ons. I had one left over from another project and thought what a cute way to add some Mackenzie –Childs to the bottom of the piece. So, I went to the Home Depot bought 3 more fence toppers at $3.95 a piece, popped out the old metal pieces at the bottom and screwed in the toppers and voila!

I used some Gorilla Glue for extra support because this table would be moved around a lot, and I wanted the legs to be secure. The Gorilla Glue would give it that extra staying power it needed. (I also used Gorilla Glue to adhere my signature heart and wings on the back)


I painted the balls white, cut a sliver (moon) style stencil from an index card and traced it around the balls of the feet to create the black “twist” you see. It was simple.


The Faux Linen top: Painted the base coat in the Deep Rose let it dry. Then mixed 4/1 glaze & Million Dollar Red.


Brushed one coat over the entire surface.While still wet. I took a ball of steel wool and dragged it from top to bottom in one straight row, its’ important to apply the same pressure throughout the stroke. Then start again at the top of the next row and repeat until the end. Turn the steel wool as you go to avoid paint build up or you can wipe it on a paper towel, but that never seems to work for me.


 The end result is a soft linen look. I finished it off with the Metallic Gold circles (remember our inspiration piece, look at the seat cushion. That’s why I wanted to create a “linen” base, to emulate the cushion. Man, aren’t I clever :D)


So the whole piece took me about 20 hours (what took the longest was coloring in all the black and white checks & zebra print! Geeesssseeee!) so you can do this people! It can be done!

I loved how it turned out. Maggie was proud that I didn’t “girl it up!” Yes, it could actually be considered a masculine piece! Whoo! Hooo! My first one! I have a terrible habit of “Girling things up!”

Here's the damage:
Dresser: $5.00 (Thrift Store)
Kylon: $3.95 (Walmart)
Fence Toppers: $ 12.98 (Home Depot)
Paint: $6 (I only bought 3 new colors and used only a 1/3 of each)

Just and FYI, Benjamin Moore has pint size testers for 6.95 which I usually buy (unless its black or white) and they usually last me a long time so save yourself some money and space and get the smaller sizes.


Colors Used:
Benjamin Moore White Dove
Benjamin Moore Deep Rose: 2004-10
Benjamin Moore Million Dollar Red: 2003-10
Benjamin Moore Blue Lapis: 2067-40
Benjamin Moore Twilight Blue: 2067-30
Valspar: Satin Black


Happy Painting
Mary


Friday

Black and Blue

Y'all know I love to redo vintage/used/tossed aside/old (shall I go on) furniture, but on occasion, like we have discussed in past blog posts, I have to do a new piece.

Okay, I can hear the sighs from here! No whining please! Don’t be disappointed in me. I’d actually be lying if I said I didn’t like to (occasionally) do a new piece. It’s fun, to just be able to prime and then start painting, skipping over a lot of prep work. Come on people, you feel me, don't you?

As I’m sure you’ve heard me say a thousand times, I’m Goo-Goo over a little shop in North Syracuse called Fireside Unfinished Wood Furniture. It’s a Mom and Pop shop, no frills, bells or whistles, but that's what makes it great. It’s chuck full of unfinished wood pieces, and everytime I walk in there my brain nearly has a spaz attack over all the different pieces I could paint. No really, I feel faint if I’m in there too long.


So, in my Etsy store I sell a lot of pre-made furniture, because I can reproduce it in a variety of styles for a diverse group of people. I buy several different tables from Fireside actually, that are easy to paint and easy to ship. This little telephone stand (which my kids laugh at because “…Mom, who uses a telephone stand for a telephone anyway? Like, Dugh?”) is one of my biggest sellers. I’m sure if you look at past posts you’ll see the variety of ways I’ve painted this table for people. Its FUN!
http://thedecorativepaintbrush.blogspot.com/2010/10/halloween-treat.html
http://thedecorativepaintbrush.blogspot.com/2010/05/telephone-stand.html

Well, when Leslie wrote me about what she wanted her table to look like I was excited to get it started. I love customers like Leslie (yet, they also make me a bit nervous too) and I’ll tell you why.


Leslie is an artist herself, a photographer and writer. She knew exactly what she wanted. She sent me pictures (of her home, other art pieces in the room). She described the colors to me perfectly, it was wonderful. I had a perfect visual as to what she wanted her table to look like. Then, the excitement turned to panic. I hyper focused. She’s an artist. She knows exactly what she wants! What if I don’t produce it? Aaaaagggghhhh!

Do you notice a trend? Artists are filled with a lot of self doubt? Ask any of us, it’s a very common thing. Whenever we do a piece of art work, in any form, we are putting ourselves out there, openly exposed, naked, standing in open judgment, to be looked at and….okay, I’m back sorry about that, I was on a therapists couch for a minute, anyway, back to Leslie, I just wanted to get it right.

Later that night I was painting in my head, as I always do, some people count sheep, I paint, hey, whatever works, right? And that’s when her design came to me.

I’ve gotten in the habit of leaving my phone next to my bed, so when I have these brilliant creative brainstorms at 3:00 am in the morning I don’t have to run to the bathroom (with a flashlight and sticky note) and scribble it down, I just grab the phone, let the glaring light burn out my retina, and (with only one eye open under my covers) I type in what I’m thinking. Once the image/idea is out of my head I can go to sleep. So, after I regurgitated this idea from my brain I fell asleep. Got up the next day and started painting.

This piece came together fast after that. If I’m going to be honest, in the past, the thought of putting black and blue on the same canvas would have freaked me out! I think that was what was holding me back. But lately, especially after this breakthrough, it’s really been working for me. I’ve actually used it in a couple of upcoming pieces as well, and I really like the look. Funny, how your color palette changes over time, kind of like your taste buds? I hated seafood growing up, pregnant with my daughter, couldn’t get enough of it, now I LOVE IT! Life is CRAZY, isn’t it!

Leslie loved with her piece by the way (“Few!” She said, whipping her hand across her brow.) If you get a chance you should check out her websites http://www.lesliecarolwood.com/ http://www.gosoakyourhead.com/. She’s got some really interesting and inspiring things, I’m sure you’ll enjoy them.


Happy Painting!

MARY


http://www.skiptomylou.org/