Showing posts with label acrylic paints. Show all posts

Sunday

2016 Business Resolutions


I can't say I was too sad to see 2015 go. I had started out in January like most people, excited about the prospects of a clean slate.  I wrote resolutions. Promised myself things would finally change. Well, change they certainly did, but not in the way I had intended them to. God had a different plan. Personally, my world was turned upside down. My life was significantly altered and all those "resolutions" I had penned in a small notebook at the beginning of the year, seemed far away, and almost childish.

But I'm glad to say, with Gods relentless help, I came through the other side and am now excited for the prospects of a year planned by God. That's the difference-it's how I approach it.

I know that God is in control and I'm going wherever he leads, BUT i also know it's important for me to take an active approach to my life as well, getting up and getting moving.  So, that's the direction I am headed in, onward & upward.  Just moving forward one step at a time and allowing God to direct my path.

That said, one of my steps forward is every Sunday i join my husband, (or soon to be husband on February 22, we are getting remarried after being divorced 14 years, lol, go figure, those are those "God has another plan" things I was talking about) in an "intentional work session". We go to Starbucks, grab a coffee (i get Hot chocolate) and we set up shop.  We work strictly on our businesses.  Coordinating schedules for the week, writing up estimates, writing this blog even.  Talk about dreams, goals and visions for what the plans are for the upcoming week, month, year and how we are moving forward business wise.  It started as a fluke but has now grown into a really rich time.  A time of focus and forward thinking.

So it is with that intension that I want to share the items I have done during the week.  If I have some creative ideas I want to share them.  As I keep moving forward with this, so does my business.  It puts things into perspective but also lets me see how far I have progressed.

Here we go.....

These are a couple items I finished this week:


I also painted and submitted two paintings that have since been approved and moved to our PaintNite library for purchase.  Magnificent Magnolia & Midnight Memories are the newest addition to my growing work in acrylics on canvas.


Come paint with me some night if you are in the Syracuse area! Go to Paintnite.com to find an event, use coupon code MARYM20 for $20 off and be prepared to relax and have fun!

I look forward to spending some time with you every week. Sharing some ideas I have percolating, projects I'd love feedback on and taking my business to the next level.  I am excited!

Please follow along on Facebook, Instagram, Pinterest or here!

happy creating!

Mary


Monday

Grandma's Table: Stephanie's Remake

This is just a quick post on a recent redo I finally finished.  I forgot to take before pictures which KILLS me but I still wanted to share the end result with you.


We are moving into a new, larger studio, which has been so exciting and yet a tad bit overwhelming!  Who knew I had so much stuff.  Our house will finally be our home again and I can't wait.  We are moving into the Delavan Center in Downtown Syracuse.  


I have been taking a lot of pictures and can't wait to share the final reveal with my peeps!

In the mean time please come play with us on Pinterest or keep updated on Face Book!


Wednesday

"chair" me up


I love painting chairs!  

They can be a great accent, to any room. No matter what the decor, if you use a coordinating color palette it can be a great way to add a bit of fun.
  
The above picture is the latest chair I had the privilege to redo; but more on that in a minute.

The first chair I ever painted was this one.  It was love at first sight!


The reason I love redoing chairs is the great curves, and various shapes that each chair provides.  Its cool how the same two chairs can be completely different by just changing the color combo, or use the same color combo on different chairs and make them match.

  Here are just a few  chair redos that i have done over the years.  Maybe they'll inspire you. 


So, now back to the most current chair.  

Jenny is a fabulous customer of mine.  She allows me great creative freedom in all the projects she hires me to do-LOVE her!  

For this project, she wanted me to paint a chair of hers to match a desk that her friend had painted for her a while back.


She had said it didn't matter if they matched exactly just use a similar color palette, so that's exactly what I did.  


Here they are together


I used Benjamin Moore colors in 

For more pictures and inspiration please come and find me on Pinterest, Instagram, FaceBook & Twitter

And just a reminder that the Etsy store is closed until Dec 20th so we can get caught up on all of our Holiday orders!

Also, if things weren't crazy enough, we are moving into our new, larger studio Dec 1st!  I am so excited and can't wait to share it with you all!


Saturday

A Jazzed-Up Speaker's Podium


 Laura had seen me at the Syracuse Arts & Crafts Festival  and wrote  me a few weeks later to ask me about a really cool idea she had.

Laura is a high school English teacher and had a vision of creating a special space where her students could read their papers/speeches from.

She had gone online to price out a few stands and soon discovered that they were a lot of money for just wood.  Nothing stood out to her as unique or fun, so she thought perhaps we could build her something.  She has seen pictures of our dog food storage boxes and thought perhaps we could build something for her classroom.

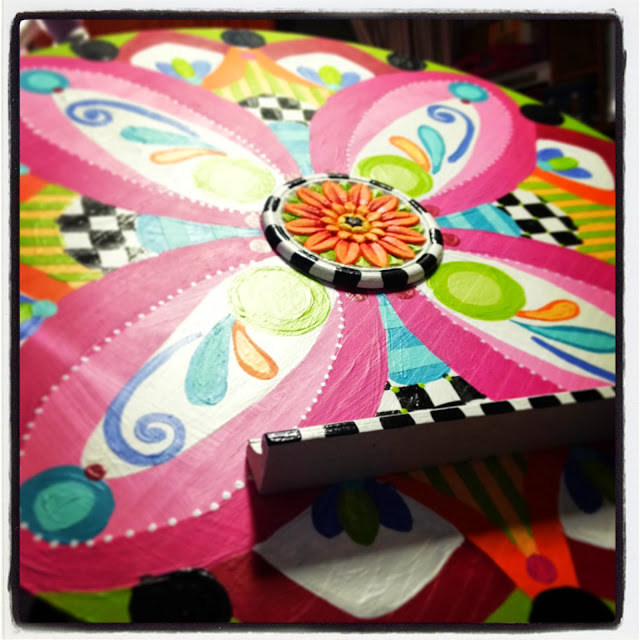
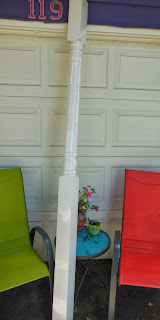
With notebook & camera in hand we went to Home Depot to do some brainstorming.  After laying out many different projects/ideas in the isles, our design really started to take shape when we saw this column.  I wrote her with our final thoughts that night and by the next day we were back at the store finalizing our plan.

These were the items we left with.


We purchased the decorative colonial house beam first.  I loved the scoops and loops, rings and things and figured I could do a lot with it.  More so than just the fence beams we had originally thought of, and much more feminine that just building a box.  We knew we'd have to cut off a lot to make it the correct size but even with that, it still had more to offer design wise.


We then found these great pre-cut circles for only $5 a piece! What?! Can you say Jackpot! 

We also purchased L brackets, and bookshelf brackets to cover the L brackets after we connected the post to the base.

We also knew because the top circle would be at an angle there would need to be something that would keep the paper from sliding off.  We had tried a variety of trim pieces, but nothing seemed to go.  Then I had an epiphany-yes, right there in Home Depot!  I would use a Scrabble letter holder! Perfect, right?!


We measured the height and then made our cuts.


Then we secured the post to the base.


Then attached the pre painted shelf brackets to hide the hardware.

We then needed to attach the top.  Now, because this was going to be used by teenagers we knew we'd have to secure it pretty darn good. Which meant we'd have to screw it into the post as well as glue it.

The thing was I wasn't trilled with the idea of having screws in the center of my art piece and I wasn't excited about the prospect of covering them up with wood putty either.  There had to be something more...decorative.


Then I found these!  For just $2 at AC Moore I found my answer.  I would screw the disk into the post then cover it up with this applique-BEAUTIFUL!


After the center piece was secure, I then glued on the Scrabble letter holder and held it in place with painter's tape until it was dry.


I finished painting the piece and added Laura's chosen quote to the front.

"Go into the world and do well. But more importantly go into the world and do good."

This was the final piece. Front and back.


This was the first project we'd ever done like this and I have to say I was pretty pleased with the end result.  I'm hoping her students will love reading from it and perhaps it may take their minds off, if only for a minute, of the terrifying task of public speaking.

Here are the next two pieces on deck.  Can't wait to get started on them!


Sharing with these crafty blogs: