Showing posts with label decorative furniture. Show all posts

Sunday

Cathy's Corner


I have an absolutely wonderful client!  The kind of person, as an artist, you can only dream about.  We have been working together for just about a year now on tons of projects.  She LOVES my work and I am forever grateful for that. The best thing about Cathy is that she always, and I mean always, gives me the artistic license to do whatever I want.  I try to nail her down on a basic color scheme, but other than that she says,  "I completely trust you!  My husband says, 'when you find someone who knows what they're doing, just move out of their way and let them do their thing.' So, I'm getting out of your way."

 Totally LOVE her!

SO, I'm going to start by sharing some of the smaller pieces I did for her, then share the largest piece (or shall I say a set) I've ever done. First off was a pair of very old, very worn out school desks.


 Both desks were extremely worn out.  I had to sand them and prime them several times.  The marker/ink/sharpie on the top kept bleeding through.  But after 3 coats of primer, it seemed pretty much under control.  Although the chairs were greatly worn they did not require as much prep work.


She had another small desk set for me next.  This used to be her mothers (I believe) as a child and she wanted to redo it for her grandchildren.  It was going to be passed on to her son, and first grandson so I stuck to a more masculine feel. Although really the patterns and color choices could have worked in any nursery/playroom.


The next item was for her youngest daughter who was soon to be a teacher.  She had seen a picture on my Facebook page of another reading/teacher chair I had done for another client and wanted one for her daughter.  She had a rocker she found and brought it down to me.


Next was 3 small rocking horses that her father had made for her 3 children when they were little.  With such sentimental value she didn't want to get rid of them now that her children were grown but hated them sitting in the basement too.  So...you guessed it, she brought them to me for a much needed face lift!  I have only had the chance to finish one completely.  The other two were put on hold for the biggest project yet.


Her daughter-in-law loved giraffes and asked if I could incorporate one into the horse someplace, so I did just that, right on the seat.

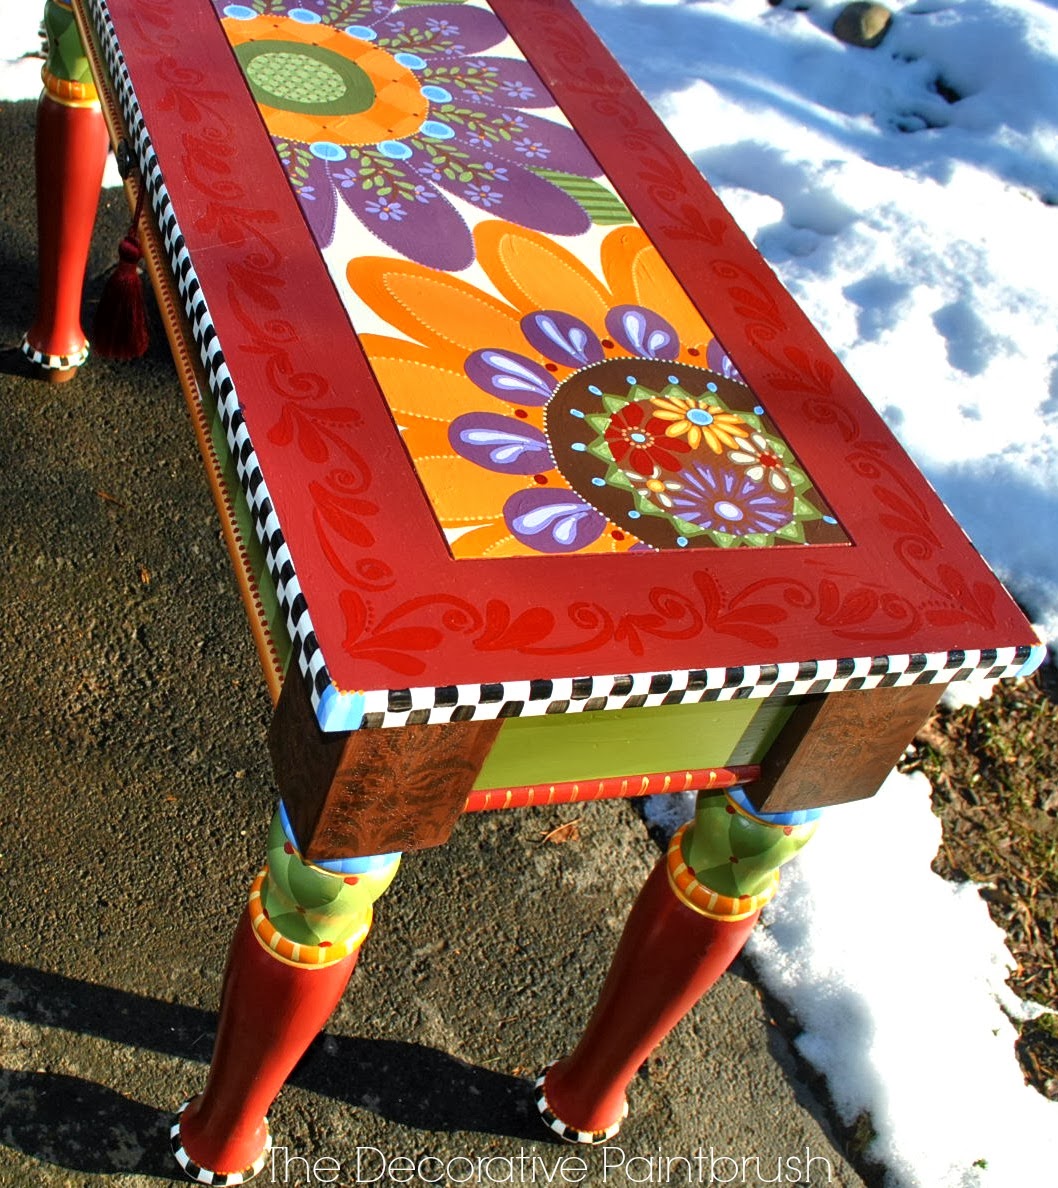
Now, drum roll please, here is the largest project I have done to date.  A six piece (5 + a cutting block) kitchen/dinning room set.  Again it was her mothers set and she wanted to pass it down to her children, but knew in the state it was in no one would want it.  

First, it was the butcher block.


A choice to do a simple faux finish on the sides with plain robins egg blue, highlighting the checkered door and diamond patterned door was perfect.  I switched out the out dated handles and swapped them out for more rustic, heartier handles.  She didn't want the top painted, so I left it neutral.  This piece would set the stage for the next 5 pieces that followed.


Then came the pedestal.  She kept the top in Rochester with her and had a gentleman refinish the top in just a plain stain and varnish.  The base was a beast.  She didn't like the original pedestal and searched high and low for one that fit just perfectly with the other pieces.  I was thrilled because this one was much more exciting to paint in comparison.


Each piece as it was finished was transported back to Rochester. I had never seen them (only in my head) all together.  BUT yesterday-she sent me a picture of all the items together, set up and ready to welcome guests! I was so excited to see them!


So that's that for now! At least what I've finished. I've still got 2 rocking horses, 2 rockers, one rather large chair and a desk set, plus she's bringing more down this week.  Like I said in the beginning-LOVE THIS LADY!

Please, check out my other social media sites and follow along there if you'd prefer!  I'm on Facebook Instagram and Pinterest!  Loads of creative and colorful quotes, pictures and inspiration! So check it out!

Have an amazing week!

Mary


Friday

Sexy Legs


I'm sure this title will probably get me some not so sexy hits on the Google search Engine, but as they said in Advertising 101, "Sex Sells!"  So, with that said, let me introduce to you, my idea of a sexy leg!

I can spot a sexy leg from miles away.  Even driving by something on the side of the road at 55mph, my eye immediately goes right to the legs.  If the legs aren't sexy, chances are I'm not going to be excited about a piece.  Who's with me here?! Okay, no one...I think I just heard a cricket?  Well maybe, I have some weird fetish, but good legs turn me on.

When this piece was dropped off to me, I could hardly contain myself, "What a leg!"  The curves, the thickness, it was beautiful. Sigh....just take a moment.  Call me crazy people but it was swoon worthy.

I usually start at the top of a piece and work down, but this time I built up.  I had my color palette. The customers front entrance was a taupe/brown color, her front door black, but she wanted this piece to make a statement.  She told me reds, greens, browns.  Of course it was perfect because I was feeling some "Fall" colors coming on.  


Now, for just a moment, look past the legs here and bare witness to my shelf of paints!  Some people are crazy cat people, me, I collect paints.  That is only the corner, it runs the whole length of the wall, onto the floor and into every crevice of the studio.  Seriously, when I say I love paint...I LOVE PAINT.  Anyway, I digress, back to the legs.  

After I base coated them out I went back in with gold metallic paint.  These legs seemed almost regal to me, and a gold accent always amps it up.


This is the best metallic out there, at least for me.  I've used a lot, but this one is thick and takes the least amount of coats to get the desired look.

The top part of the leg was painted brown and a little blah, for my taste.  Even after I painted a design on it, I still wanted it to have more visual interest, so I crackled it.  

I buy a crackle paint that goes on top of a piece.  Then you let it set, and as it sets it cracks.  


Or if you are impatient like me, you blow dry it.  What you get are these tiny little cracks (or larger, depending on the amount you brush on).  It almost gives the effect of porcelain. Here a some pieces I've done this technique on in the past.


You get the point.  The thing is, this is a fast and easy way to give character to a piece.
You brush it on in a well ventilated area, unless you like getting high on fumes.


 Blow dry it.  It only takes minutes to set up


Then you see the cracks appear. It's really kinda cool.  If you spread it on in different directions you get cracks going in different directs (see how that works).  Once I have the cracks I want, I take some stain, rub it into all those little cracks, and get that beautiful aged look we love so much.

Okay, so we've got the sexy legs going on, now for the top.   Over the past years, I feel my art work is evolving into a more folky, indy, type of art. Like this cedar chest and this podium or this end table.  I like the flower patterns, circles and pointillism if you will.  You kind of just keep adding and going deeper into your piece, until someone has to come in and slap you into reality. I felt this piece was calling for that slap worthy kind of style.


I laid out the basic design first.  I just used stencils that I cut out of manila folders (love manila folders-but that's a whole other post) and traced around them.  I'm a planner to a degree, I don't usually just PAINT I always draw out my design first.


The end result were these bold, detailed flowers. Once the flowers were finished though I knew the perimeter needed something, but I didn't want it to compete with the inner part, so i opted for a scrolling design (caring your eye gently around the piece) in a very similar color, making the design, very subtle.  


Then I brought in stripes around the underneath part.  Using a credit card to smooth down the tape is a fabulous idea!  NO BLEEDS!


A lot of this piece was done in monotone colors, to create visual impact without really taking away from the focal point, which was the flowers.  


In that spirit, I added light brown circles to an espresso brown drawer and added a new knob (which I changed out for a handle as you can see in the below pictures).   Slapped on a cute tassel for bling and here's the final piece, sexy legs and all.


So there you have it...I guarantee after this post  you wont look at furniture legs without a little smile on your face.  You'll think of me and say. "She's right, those are damn sexy legs!"

Happy Holidays!