Showing posts with label funky furniture. Show all posts

Friday

Miniature Table for 2


Hi creative friends!  

It's been a little bit since I last posted but please know I have been VERY busy! Our Etsy Store has been booming!  So, that means I haven't had a lot of time for custom  orders.  I miss painting furniture so much! I truly do.  Don't get me wrong painting the smaller items in our store is fun, but furniture is therapeutic and gets my creative mind moving.  I'm working on a bunch of other pieces right now, so hopefully I'll have more pieces to post very soon.

We first did two tables for Mike (are wonderful friend from the paint store) a couple of years ago.  They wanted these two missed matched pieces to come together with a fresh and funky look for their daughter who was getting her own place.


Once finished they looked like this.  The pictures aren't that great, we remembered to take them just before they picked them up, but you sort of get the idea.


Now they were ready for their 3rd piece!  Love these people!

This was the inspiration piece. The patterns didn't need to be identical but they really liked the color palette/combination. 


You can't see it in the picture below but the leg on this piece had been repaired at one time and had now come apart again.  We tried to fix it with Gorilla glue, but it didn't work.  We had to remove the leg, scrape the old glue off, nail it back into place and then secured it/ sealed it with a wood epoxy. It was quite a project, but after it "set up" it was like new.  When that was finished, we sanded the entire piece and primed it with Bullseye 1-2-3 primer from Zinsser, twice.


 The final piece looked like this.


The matching table is on deck next.  It's a bigger project then this smaller one.  Here's a sneak peek!


I'd love for you to come join me on my other pages:  Pinterest FaceBook Twitter and Instagram Let me know you're there and I'll follow back.  I get so inspired by all of you!

Thanks for following along here!  


Sexy Legs


I'm sure this title will probably get me some not so sexy hits on the Google search Engine, but as they said in Advertising 101, "Sex Sells!"  So, with that said, let me introduce to you, my idea of a sexy leg!

I can spot a sexy leg from miles away.  Even driving by something on the side of the road at 55mph, my eye immediately goes right to the legs.  If the legs aren't sexy, chances are I'm not going to be excited about a piece.  Who's with me here?! Okay, no one...I think I just heard a cricket?  Well maybe, I have some weird fetish, but good legs turn me on.

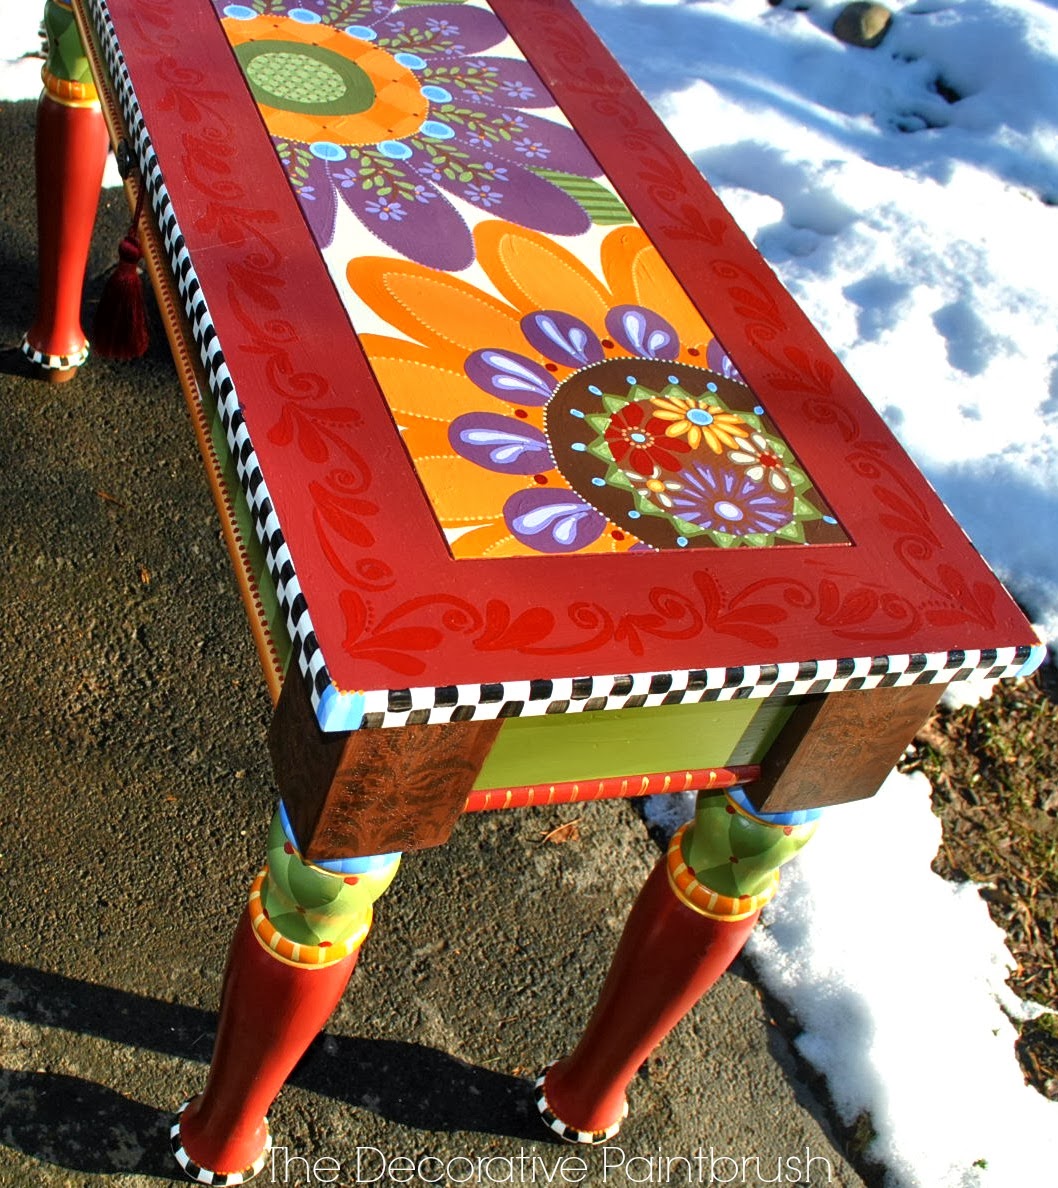
When this piece was dropped off to me, I could hardly contain myself, "What a leg!"  The curves, the thickness, it was beautiful. Sigh....just take a moment.  Call me crazy people but it was swoon worthy.

I usually start at the top of a piece and work down, but this time I built up.  I had my color palette. The customers front entrance was a taupe/brown color, her front door black, but she wanted this piece to make a statement.  She told me reds, greens, browns.  Of course it was perfect because I was feeling some "Fall" colors coming on.  


Now, for just a moment, look past the legs here and bare witness to my shelf of paints!  Some people are crazy cat people, me, I collect paints.  That is only the corner, it runs the whole length of the wall, onto the floor and into every crevice of the studio.  Seriously, when I say I love paint...I LOVE PAINT.  Anyway, I digress, back to the legs.  

After I base coated them out I went back in with gold metallic paint.  These legs seemed almost regal to me, and a gold accent always amps it up.


This is the best metallic out there, at least for me.  I've used a lot, but this one is thick and takes the least amount of coats to get the desired look.

The top part of the leg was painted brown and a little blah, for my taste.  Even after I painted a design on it, I still wanted it to have more visual interest, so I crackled it.  

I buy a crackle paint that goes on top of a piece.  Then you let it set, and as it sets it cracks.  


Or if you are impatient like me, you blow dry it.  What you get are these tiny little cracks (or larger, depending on the amount you brush on).  It almost gives the effect of porcelain. Here a some pieces I've done this technique on in the past.


You get the point.  The thing is, this is a fast and easy way to give character to a piece.
You brush it on in a well ventilated area, unless you like getting high on fumes.


 Blow dry it.  It only takes minutes to set up


Then you see the cracks appear. It's really kinda cool.  If you spread it on in different directions you get cracks going in different directs (see how that works).  Once I have the cracks I want, I take some stain, rub it into all those little cracks, and get that beautiful aged look we love so much.

Okay, so we've got the sexy legs going on, now for the top.   Over the past years, I feel my art work is evolving into a more folky, indy, type of art. Like this cedar chest and this podium or this end table.  I like the flower patterns, circles and pointillism if you will.  You kind of just keep adding and going deeper into your piece, until someone has to come in and slap you into reality. I felt this piece was calling for that slap worthy kind of style.


I laid out the basic design first.  I just used stencils that I cut out of manila folders (love manila folders-but that's a whole other post) and traced around them.  I'm a planner to a degree, I don't usually just PAINT I always draw out my design first.


The end result were these bold, detailed flowers. Once the flowers were finished though I knew the perimeter needed something, but I didn't want it to compete with the inner part, so i opted for a scrolling design (caring your eye gently around the piece) in a very similar color, making the design, very subtle.  


Then I brought in stripes around the underneath part.  Using a credit card to smooth down the tape is a fabulous idea!  NO BLEEDS!


A lot of this piece was done in monotone colors, to create visual impact without really taking away from the focal point, which was the flowers.  


In that spirit, I added light brown circles to an espresso brown drawer and added a new knob (which I changed out for a handle as you can see in the below pictures).   Slapped on a cute tassel for bling and here's the final piece, sexy legs and all.


So there you have it...I guarantee after this post  you wont look at furniture legs without a little smile on your face.  You'll think of me and say. "She's right, those are damn sexy legs!"

Happy Holidays!


Monday

Jenny's Jewelry Box Makeover


You'll hear me say this over and over again...I LOVE TAKING SOMETHING OLD AND MAKING IT NEW AGAIN!  Like, it's an addiction for me.  When I first started painting furniture I used to plan, draw things out, create different color combinations, blah, blah, blah! But as my business grew time became short, so I just started to "wing it" and the results have, for the most part, been pretty cool.  Now, that's not saying I haven't switched up mid way through a design, just because something didn't sit right with me, but for the most part the "freedom to create" mentality has been working pretty well for me.  Especially, when a flexible, open minded person gives me "free range" OH, HOW I ADORE THOSE PEOPLE!  Case and point; Jenny's Jewelry Box!


I had done other work for Jenny (see her owl mirror here) and she had mentioned she had a jewelry box that she wanted to have redone.  "Well, absolutely! Bring it over!" I said.  Always up for a challenge!  I actuallly had never "done or redone" a jewelry box of this size before!  I have done a million smaller ones but never one this large and when she plopped it down in my foyer, I thought, hmmmm...what a fabulous piece.  The thing was though, I felt limited in my design because of the "Greek Styled" scalloped top and pillars.  So, I had to think about my approach for awhile.


This was the space that it was going in.  So, I knew the colors had to be a bit deeper and more richer than the pieces I usually do.  It was time to grow up a bit.  I loved the the leather and iron fixtures and furniture, so I knew those had to be incorporated some how. BUT I do know Jenny too, and I knew it had to be playful and fun as well.  


I decided to go with a "faux" leather look (see the tutorial here) on the pillars and legs.  Then brought in the "iron" look by spraying the hardware black.


The playfulness is found in the Cheetah print on the side and the decorative elements through out.


  The really cool thing about this jewelry box too, is all the hidden surfaces, things you don't necessarily see right away.


My most favorite part of this piece, the one that just kind of evolved, was the top.  I wanted to personalize it, like I do my smaller jewelry boxes but yet, I wanted it to be more sophisticated, so I chose her initials  and then built my design around that.


There you have it!  


How do you tackle your "redo" projects?  Do you just wing it or do you plan it out?  Do you choose colors first, or just let it evolve?  I'd love to hear your ideas!  Write me here or leave a comment on our Face Book page!