 |
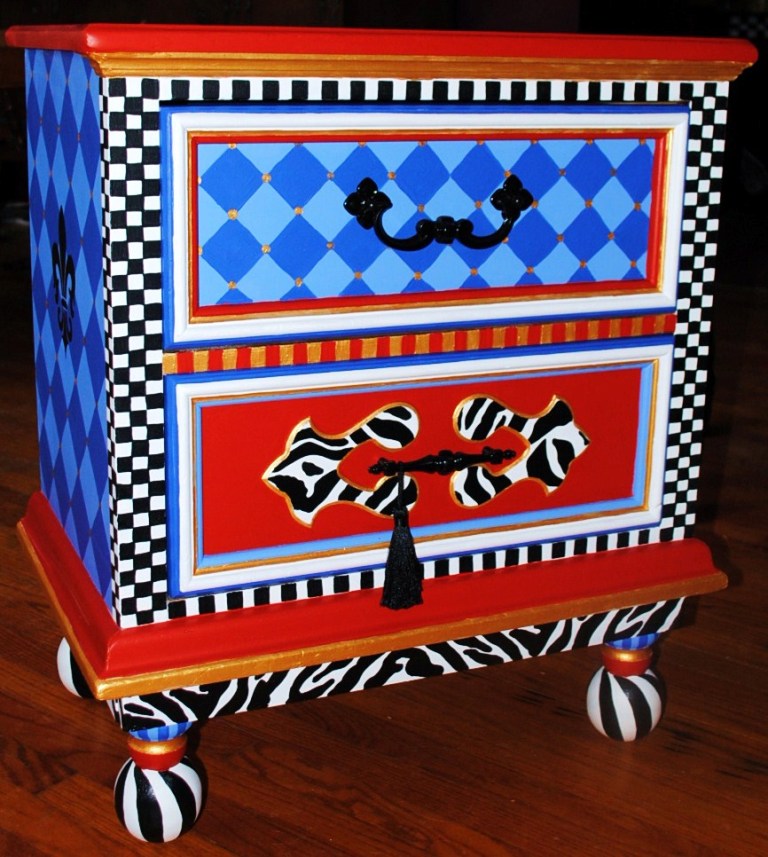
| MacKenzie-Childs Chair |
Over the years people have told me that my work reminds them of MacKenzie-Childs. Now, I take great pride in that, because their work is amazing, and to even be remotely thought of, even in the same sentence, is hugely complementary.

Every month the catalog comes to my house and I devour it, cover to cover, absorbing it like some type of junkie trying to get a fix. This time around I was inspired by this
beautifully overstuffed chair and it’s
blue on blue harlequin pattern. Now, I can paint, but I CAN NOT reupholster, so I decided to use this piece as inspiration for an end table that had been marinating in the studio for awhile.
Before we begin, I want to let you guys in on a little secret; I really don’t consider myself an artist per say, not in the traditional sense of the word. What I do on furniture, anybody can do. My patterns are
simple. I
cheat, a lot. I use stencils and transfer paper to draw (although I could do it free hand if I wanted, it’s just easier to grab a stencil, draw it on and color it in like a big coloring book) and I use embellishments to pump up my pieces (wooden cutouts). I’m more of a
Creative Organizer. I know how to mix patterns up, put them together and make them look somewhat decent. But what I’m thinking, is this…I can teach you how to do it too!
It really isn’t that hard! So, let’s just start with this piece and go from there, I’ll have you painting funky pieces in no time!
Step one: Prep Work I know, we discussed this before, if there was a way to skip prep work, yours truly would be all over it!
Remove hardware. I decided to keep it and reuse it for this piece, just because it was so unique and fit the piece so precisely.
The beautiful dog in this picture decided she wanted to use the corners as a chew toy so Maggie had to fill it with wood putty (a couple times) and sand it back to its original shape. She uses Zar Wood Patch. (Although it says it takes stain, it doesn’t, so if you’re planning on staining your piece after applying it, don’t, because it doesn’t match up, but if you are painting it works great). It dries as hard as real wood, it’s wonderful.
Then I had to sand the entire piece. I use an electric sander on the larger areas and a smaller individual low grade sheet on the more detailed areas.
Then we prime. I primed the entire piece in two coats of an acrylic based primer. You could use an oil based primer, for best results, but personally, I hate the clean-up, and acrylic works just as good.
Step Two: Base Coating Base coating to me is still a tedious job! Yay, sure, it’s fun to see the colors going on, you start to get a vision for the finished piece but mainly it’s BORING! But good prep work and good base coating can really make or break a piece. It isn’t just the pretty work that sells, its everything, it’s a team effort. So, take the time to invest in this step (Hahaha! when Maggie reads this she’ll laugh me right out of the room! Okay, it’s no big surprise that patience isn’t my strong point, but I’m trying to be a good teacher, remember!)
It’s also important to use good products when painting. My larger brushes are all
Purdy. I’ve tried so many others, believe me and Purdy is the best. Its bristles hold the paint the best, giving you a nice cut in line, with less drips. I wouldn’t use anything else. My brushes are very loved as you can see!
But here’s a trick, if you put it back in its wrapper (after you have washed it out and patted it dry) it will continue to hold it’s great shape for a very long time. I use a 1.5” chiseled cut brush 95% of the time it gives me the best control.
I also, used
Krylon Indoor/outdoor gloss black spray paint to spray the hardware. I don’t always reuse the hardware on my pieces but this piece would have looked silly with any other hardware, so I decided just to update it with a fresh coat of color. Krylon dries fast and is very durable. I just put the pieces on an old piece of cardboard and sprayed away.
Step Three: Pretty Work! Yep, my favorite part! But it can be yours too! Really it’s not too hard! First, remember our inspiration piece…Well, I did the sides in the blue diamonds. All I did was trace a square (from a stencil, didn’t even measure one out) cut it out, turned it on its side and drew each diamond next to each other, each tip touching the next. I knew I would have to repeat that pattern again somewhere in the piece so I did it in the drawer area. I just cut out a smaller square and did the same thing there. Remember, the corners don’t have to match up perfectly because we will go back in and where each diamond meets we will put a circle (this will cover up any lines that fall short).
Next, Zebra print! Got a great stencil, thought it would go well with this piece. I traced it on the back, around the bottom, the drawer panel and on top, and then colored it in.
Then the black and white check, which is usually included on every piece I do. Which is another reason why people find a similarity between my work and MacKenzie-Childs, although her checks are much more classier?
The ball feet were add ons. I had one left over from another project and thought what a cute way to add some Mackenzie –Childs to the bottom of the piece. So, I went to the Home Depot bought 3 more fence toppers at $3.95 a piece, popped out the old metal pieces at the bottom and screwed in the toppers and voila!

I used some
Gorilla Glue for extra support because this table would be moved around a lot, and I wanted the legs to be secure. The Gorilla Glue would give it that extra staying power it needed. (I also used Gorilla Glue to adhere my signature heart and wings on the back)
I painted the balls white, cut a sliver (moon) style stencil from an index card and traced it around the balls of the feet to create the black “twist” you see. It was simple.
The Faux Linen top: Painted the base coat in the Deep Rose let it dry. Then mixed 4/1 glaze & Million Dollar Red.
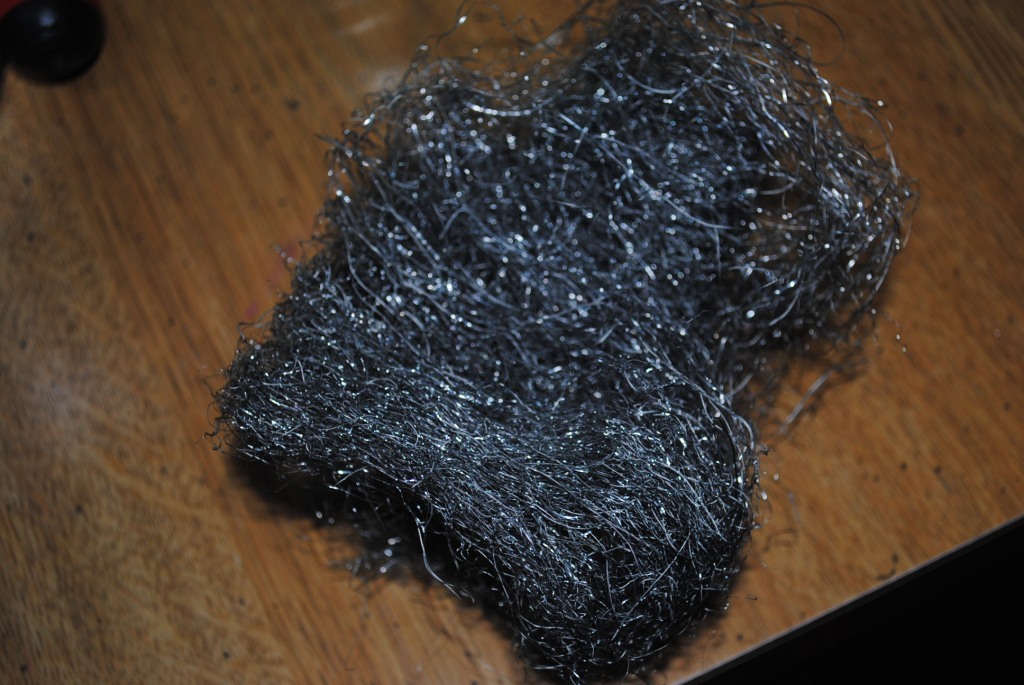
Brushed one coat over the entire surface.While still wet. I took a ball of steel wool and dragged it from top to bottom in one straight row, its’ important to apply the same pressure throughout the stroke. Then start again at the top of the next row and repeat until the end. Turn the steel wool as you go to avoid paint build up or you can wipe it on a paper towel, but that never seems to work for me.
The end result is a soft linen look. I finished it off with the Metallic Gold circles (remember our inspiration piece, look at the seat cushion. That’s why I wanted to create a “linen” base, to emulate the cushion. Man, aren’t I clever :D)
So the whole piece took me about 20 hours (what took the longest was coloring in all the black and white checks & zebra print! Geeesssseeee!) so you can do this people! It can be done!
I loved how it turned out. Maggie was proud that I didn’t “girl it up!” Yes, it could actually be considered a masculine piece! Whoo! Hooo! My first one! I have a terrible habit of “Girling things up!”
Here's the damage:
Dresser: $5.00 (Thrift Store)
Kylon: $3.95 (Walmart)
Fence Toppers: $ 12.98 (Home Depot)
Paint: $6 (I only bought 3 new colors and used only a 1/3 of each)
Just and FYI, Benjamin Moore has pint size testers for 6.95 which I usually buy (unless its black or white) and they usually last me a long time so save yourself some money and space and get the smaller sizes.
Colors Used:
Benjamin Moore White Dove
Benjamin Moore Deep Rose: 2004-10
Benjamin Moore Million Dollar Red: 2003-10
Benjamin Moore Blue Lapis: 2067-40
Benjamin Moore Twilight Blue: 2067-30
Valspar: Satin Black
Happy Painting
Mary


 I used some Gorilla Glue for extra support because this table would be moved around a lot, and I wanted the legs to be secure. The Gorilla Glue would give it that extra staying power it needed. (I also used Gorilla Glue to adhere my signature heart and wings on the back)


35 comments:
Wow..that is really neat looking, so colorful and a fantastic paint job.
Love this piece...I have also painted some furniture and it does take many hours, but its worth it....My favorite part is the finishing work, too! Do you ever spray paint the wood?
Wow - that is so cute!!! My daughter would go crazy over it.
Thanks for the great info Mary! I have wanted to do this for sooo long! I love your blog!
Love Love Total Love.
Just when I think I've done something inspired you one up me but I'm glad because you motivate me to up my game.
Thanks for the tutorial and the gorgious images. I love getting additonal hints from you. This piece is a real work of art. Good for you.
FYI though, you have the word inspiration misspelled in your title. Thought you probably just missed that and might want to edit it...
Pam
LOVE this...just beautiful! rarely use stencils but Love your idea about the moon/cresent one for the fee to get the swirls! I've done that before freehand and they never come out even
OMG! Thank you Pam I just changed it! I HATE that! I always double check everything and there is always something that gets past me, usually the title you don't spell check, LOL! Thanks for the catch! And thanks for your compliments!
MARY, that's quite a piece of art!! Very nice.
Thank you so much for your tutorial and your contribution to our DIY CRAFT TUTORIAL linky party.
We love featuring great articles like yours and appreciate people following the party 'rules' and linking back to us so we can all share in the fun.
Look forward to seeing you again next week!
THANK YOU!! You have motivated me to finally take that step in funky painting. Now, can you teach me how to not feel bad about taking people's furniture that have been put to the curb? I still feel funny about it!
Love your table!
I love MacKenzie-Childs but not the price tag. I'm so impressed with your skills!
Your work is just awesome! I loved it!
xoxo
Cintia ( Tin ) Fumagalli
You rock girl!!! Love it!
Compe. It is fabulous!tition for M&C
What a fun and crazy piece! That looks like way to much work for me but it turned out great.
Thanks for linking up to FFA!
Hannah @ http://youngancrafty.blogspot.com/
This looks AMAZINGLY AWESOME.. Makes me want to grab my paints and start my own cool creations! Seriously, Great JOB! :)
I just love your crazy use of color and creativity. Also enjoyed reading parts from your other blog...so real and honest. Good for you!
Awesome!
I have just the piece that needs a little glaming up.
Come link to our friday's favorites party~ so I can find you again for my tutorial!
I love this piece, and you even did the back. Too cool.
Amazing detail work!
I can always spot you guys b/c your piece is so colorful & it POPS! I love the patterns, colors & the fence toppers. It's really cool (I would say pretty but that might make it sound girlie!) JenT
Wow...it's awesome! Beautiful transformation and great job!
A 'creative organizer'? Are you kidding me? Girl, you are an artist thru and thru! This is fabulous. Yes it reminds me of M-C but has a different . . . flavor? No, my dear, You are an Artist!
Love all the tips too! Great post!
Would love for you to drop by and link up to Passion for Paint this weekend.
http://MuralMaker1.blogspot.com
Girl--you have some serious talent.
Great Job
Cheri
That is too cute!!
Thanks for linking up to Craftify It Thursday!
Jennifer
OMGoodness...this is way "COOL"!!!! I’m having a GIVEAWAY this week at my NIFTY THRIFTY TUESDAYS PARTY…would love for you to come by to enter the giveaway and also link up to my PARTY…hope to see ya there:)
Blessings,
Linda
i absolutely love it. i love the bold color contrast and the use of black/white check. great job.
LOVE IT!!!!!!!!!!!!!!You are awesome.
It looks soooo good! I love how you even added the tassel!
Wow, awesome job on the cabinet, and great tutorial! Thank you for linking to Masterpiece Monday. Mary :O)
your piece is divine. really. i love the zebra and the checks with the colors...
swoon.
thanks for linking to creative juice!
hope to see more from you this week...
I'm so impressed with the zebra and the checkereds.
Btw, do you want to gain more blog followers? Then come on and join my "Swap Followings" Linky Party. This is an excellent opportunity for every blogger to meet other bloggers, follow them, and be followed in return. How does this work? Just simply "swap your following" which goes like this, "I follow your blog so please follow mine." The requirements are simply include the party button in your post, link up, then follow 2 or more blogs so they can follow you in return. When you decide to join, click http://www.homemakeronadime.com/2011/01/swap-followings-linky-party-012411.html and this will lead you to our party.
The link is going to close at 11:59 pm on Friday and will open again on Monday at 5 pm, PST.
Bring your best virtual smile, be prepared to meet great bloggers, and see you there! :)
First time visitor - I know I will be stopping by often in the future. I admire your talent and imagination, you have inspired me. Thanks.
I have sent you a Stylish Blogger Award today. You were an easy choice for me since I have been a fan for awhile now and this post was possibly your best ever.
The award asks that you link back to me and pass it on to ten other bloggers along with seven interesting facts about yourself.
Have a great weekend.
Pam
Hi Mary, I love your end table! And thank you for the tip on the Zar wood patch. I just wanted to let you know that I featured it this week on my "Top 10 Fav Picks" at Boogieboard Cottage. Have a great weekend! Mary :O)
Awesome...enjoyed the tut!
Post a Comment