


 I always start by sanding a piece. There is much debate as to whether you should sand or not, and believe me if I thought I could really get away with it, I would! I'm always looking for a short cut. I hate prep work, which is what Maggie usually does it, I prefer the "pretty work" but when Mags isn't home and I need to get started on a piece, I need to step up and do the prep, which always meansn a good sanding. {Booooo!}
  When I can't use a power sander, say on the legs or small corners, (and I have tried taking huge chuncks out of the sides) I'll use a low grit piece of sand paper to get into these areas (please learn from my mistakes).
 Then take a tacky cloth, or if you don't have a tacky cloth a damp paper towel will do, and clean the surfaces of any sanding dust, lint or fuzzies (or in my case Black Lab hair) before you paint.
 You will often see me work from bottom to top. People think I'm crazy because who sees the bottom or underneath, right? Well, I am a DETAIL FREAK and if it looks good from the bottom its going to look even better from the top! Believe it or not a piece of furniture can be scene from a variety of angles and painting from bottom to top gives you a different perspective.
 It really doesn't matter what color primer you use, unless you're doing a red or deep toned color. Because reds/deep toned colors have more pigment in them than actual "paint" they require more coats to actually give you the color you're looking for. Using a darker primer like gray can cut that process in half. Gray primer actually works better than a red primer. I happened to have Acorn primer left over from another job so I decided to use that up. I use Seal Grip by Pittsburgh Paints.
 It's also important to note that my larger brushes are all Purdy. To me Purdy is the best brush you can buy. It gives you the cleanest cut, holds the paint better and grips the piece better. My favorite size is a 1 inch with a chiseled edge. After you wash your Prudy if you put it back in its packaging it will keep its shape and last much longer than normal brushes. Can you tell I'm loving my brush.....
 Okay, so once the entire piece is painted upside down I flip it back over, right side up, to start on a second coat.
 For pieces that I know are going to get a lot of use, like this table per say, I like to slap a second coat of primer on them. I just think it helps to add some extra superman power shield to it.
 Every piece I do gets a folder. Part of that folder is a color card. A "Recipe Card" if you will. This is where I play with color combinations. That doesn't mean once they get on the piece I don't add, subtract, or switch them around, but for the most part this gives me a good idea of where I'm going. You can see I actually liked the Gliddon red better (the one with the star next to it) It just seemed to play better with the group. What do you think? Million Dollar Red thought it was "all that and a bag of chips".
 Every piece I do has white and black in it, or some degree of it (cream & brown, white &gray, white & brown, black and cream) I usually lay down these colors first. Its important when doing acrylics to work from the bottom up. You'll need to place your bottom/background colors first and these usually tend to be my B/Ws. Plus, my B/Ws are usually my larger sections.
 Then I start to lay the first coat of paint. I start with one color and hit all the major parts where that color will go. Than I'll start with another color. I tend to work in order of colors instead of section at this point. First, I'll do all the red spots, then all the pink, so on and so on....blah, blah, blah :)
 Once all the first coats of color are down you can start to see how the piece might look. To me this is when the piece really starts talking. Just spilling its guts! Before you start you have a bit of an idea of what you want the finished piece to look like, but to me, when you get that first layer of paint down, the whole thing can change.
  I knew I wanted to use the flowered tray design on the bottom. and I knew I wanted circles around the outside, but pretty much that was it. So, I drew what I knew for sure, first. Then drew the bigger circles within circles, but what to fill them with? The stripes balanced all the circles. The B/W checks balanced all the wild and zany colors. The Kanji symbol for "happy" was perfectly centered, giving the piece a Zen like feel, grounding it, instead of allowing it to go completely off the charts. To mesh the top in with the bottom I worked the flowers into the B/W check and took the B/W checks and placed them on the bottom of each leg, creating a nice flow throughout the piece.
 I also like to use a lot of animal prints in my pieces. By far my favorite is the snow leopard print. I love the crispness of the white and black. I think it works well with piece and just added another dynamic of funkiness to the body.
 Once I've drawn out my designs I start to color in. When I was a little girl I always wanted to grow up an be a famous coloring book colorer. Don't you wish there was such a job! I could sit with my Crayola's and color forever. Well, although this is acrylics this bares a canny resemblance to coloring in a coloring book wouldn't you say. So, in a way I got to do what I wanted to after all. Let that be a lesson, never give up on childhood dreams, no matter how silly they seem.
 So, I'm making progress. Still working with a color at a time.
 This is my make shift stand. When I'm working with a piece this large and heavy it can't go on my work table so I'm usually on the floor (or in my chair) working around it. To make things easier, I prop it up on a lazy susan, so I can easily spin it around.
 Now, the 2-3 coats are on. Time to flip it over and do the underside.
 Usually, I start on the underside first so as not to ruin the design on top but I was so excited to draw out this design first I couldn't help myself. I put a towel down so I would scratch it up and began to paint the lips, and sections I couldn't see when it was flipped around.
 I know, you're saying, "Mary, no one is going to see this why waist your time and paint?" Honestly, I can't help myself! I feel guilty if I don't, like I'm not putting out my best work, like I'm cheating you somehow. It just doesn't feel finished to me unless it's done but hey, if it doesn't bother you, skip it! When I'm doing a piece for my own house....As my Nonno always said, "Forget about it!"
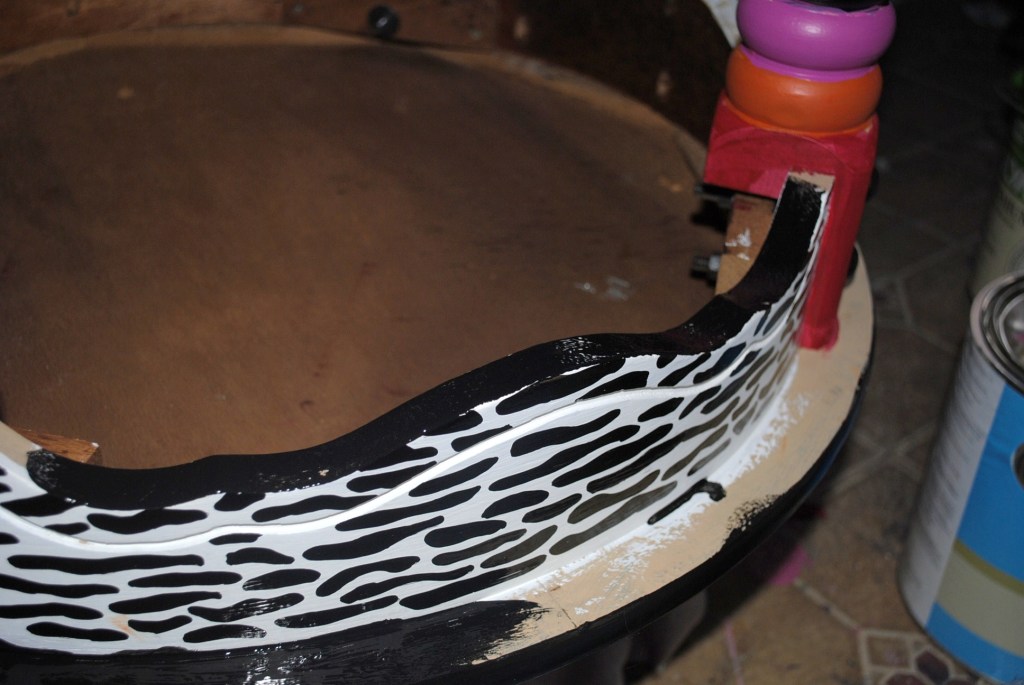
 I've tried so many paint pens over the years and these just work the best for me. They have great coverage and don't streak when lacquered. They don't bleed, run and last for a pretty long time. You can find them at most craft stores.
 I use them to make great polka dots. They are usually pretty juicy and make a pretty even dot.
 I didn't put a lot of detail into the legs on this piece because the top and bottom sections were so bold I felt that the legs needed to be understated otherwise it would have been too busy.
 Like I said before I did bring the checks down into the feet.
 As I get closer to the end my paintbrush gets smaller. The details become finer. I start making smaller corrections and pulling things tighter. During the moving around process things get bumped and chipped this is where I do touch ups and fine tune everything.
 Smudge marks get touched up with paint.
 I put a big light on the piece and go over it with a fine tooth comb. Funny thing is, without fail, i'll still find stuff every time I bring it outside in the sun to lacquer it! UGH! It gets me every time!
 I've been striping (no not stripping, LOL! I had to check that though before I wrote it!) for a long time but I still use tape. This time I did free had a good majority of my stripes and came back in at this stage and cleaned them up with tape. Mainly it was the white area which needed the most touch ups. For this the regular old painters tape worked well enough, but for serious striping Frog Tape is the best. You can also see that at this point I am taking the paint pens and outlining the flowers, lines & circles in black to create an even more eye popping design.
 Nip n' Tuck
 I spray a couple coats of Lacquer on the surface before I put my coats of Poly on. This prevents streaking or tugging of the paint. It puts a barrier in between.
This is the final piece! I love the colors. Pink, Orange, Red, Green, Black & White, what a really powerful combination! And the Kanji symbol is perfect "HAPPY" because that's all you feel when you look at it.


10 comments:
Oh, Mary, this tutorial is fabulous! I found a piece of furniture a couple of weeks ago at a thrift store that just screamed for some of this attention. I reluctantly walked away from it because I don't have the room or the time to play. But, maybe -- your tutorial makes it even more tempting. Good stuff, Mary, as always! Thanks for sharing!
Wow, it doesn't even look like the same table.
Phew... I'm tired just looking at all you did.
Looks great! You're an artist, girl! Nice work!
Blessings and have a happy weekend!
~Michelle
Holy crow! This is amazing! I LOVE it! Your talent never ceases to amaze me You have to create a show. You and Maggie need SHOW. Just sayin'!
This table is wild and I love it. You do good work and have great imagination. Terry
Wow...cute
Man it came together beautifully! love it.
Deb
Just outstanding! So joyful and fun. I love it.
Furniture whisperer! LOL! That is an absolutely fabulous transformation on that table and it just looks so cheerful! Thank you so much for coming over and linking it up to my Inspiration Friday party this week!
Vanessa
Wow! You put so much into your craft. Well done!
I sighed with relief when I found your site! I love this kind of painted furniture but I have a hard time putting paint brush to wood. I have to have inspiration. I'm not an artist, just a stay-at-home homeschooling mom trying to reduse, reuse and recycle. As I type this my neighbor has put out two really ugly side tables and I want to go over there so bad to rescue them. I am scared! Thanks for your beautiful pictures!
Post a Comment