Showing posts with label trash to treasure. Show all posts

Tuesday

MKC Squared


How many of you made New Year’s resolutions last night? Okay, I’m raising my hand too! Glad to see I’m in good company.  I have a lot-A LOT! For business and personal. Like thousands of Americans what tops my personal list (pretty much every year) is losing weight. 


BUT as far as my business one…this year it’s writing. 

I have two romance novels in the works (one completed, one cruising a long) I’m also illustrating a book of poetry with my teenage daughter (when we started this project things were light and airy but the more I lose her to teenager land the more Gothic and dark things become, so I might have to wait till she grows out of this).


 I’m also working on an e-book about painted furniture (Guess you didn't see that one coming).  Not sure who would buy it, but it isn't necessarily about the money-it’s just a goal of mine-and if I make money doing it-icing on the cake (see full circle back to my personal goal-food reference alert). 

Another writing goal; keeping my blog current, which means posting at least 2xs a month, hopefully every week. I’d also like to do more tutorials-I’m all about sharing my secrets (If you ever want to know how to achieve a certain look, let me know, I’ll tell ya!)

So, without further ado here is my first post of the New Year, a short tutorial no less. Seems as if I’m headed off on the right track-Let’s see how long I can keep up with this goal :D

I had a client find me through a previous customer.  With all the craziness of the holidays though, I forgot to take a "before" picture. Obviously, you can see I remembered after I had applied the first coat of paint.
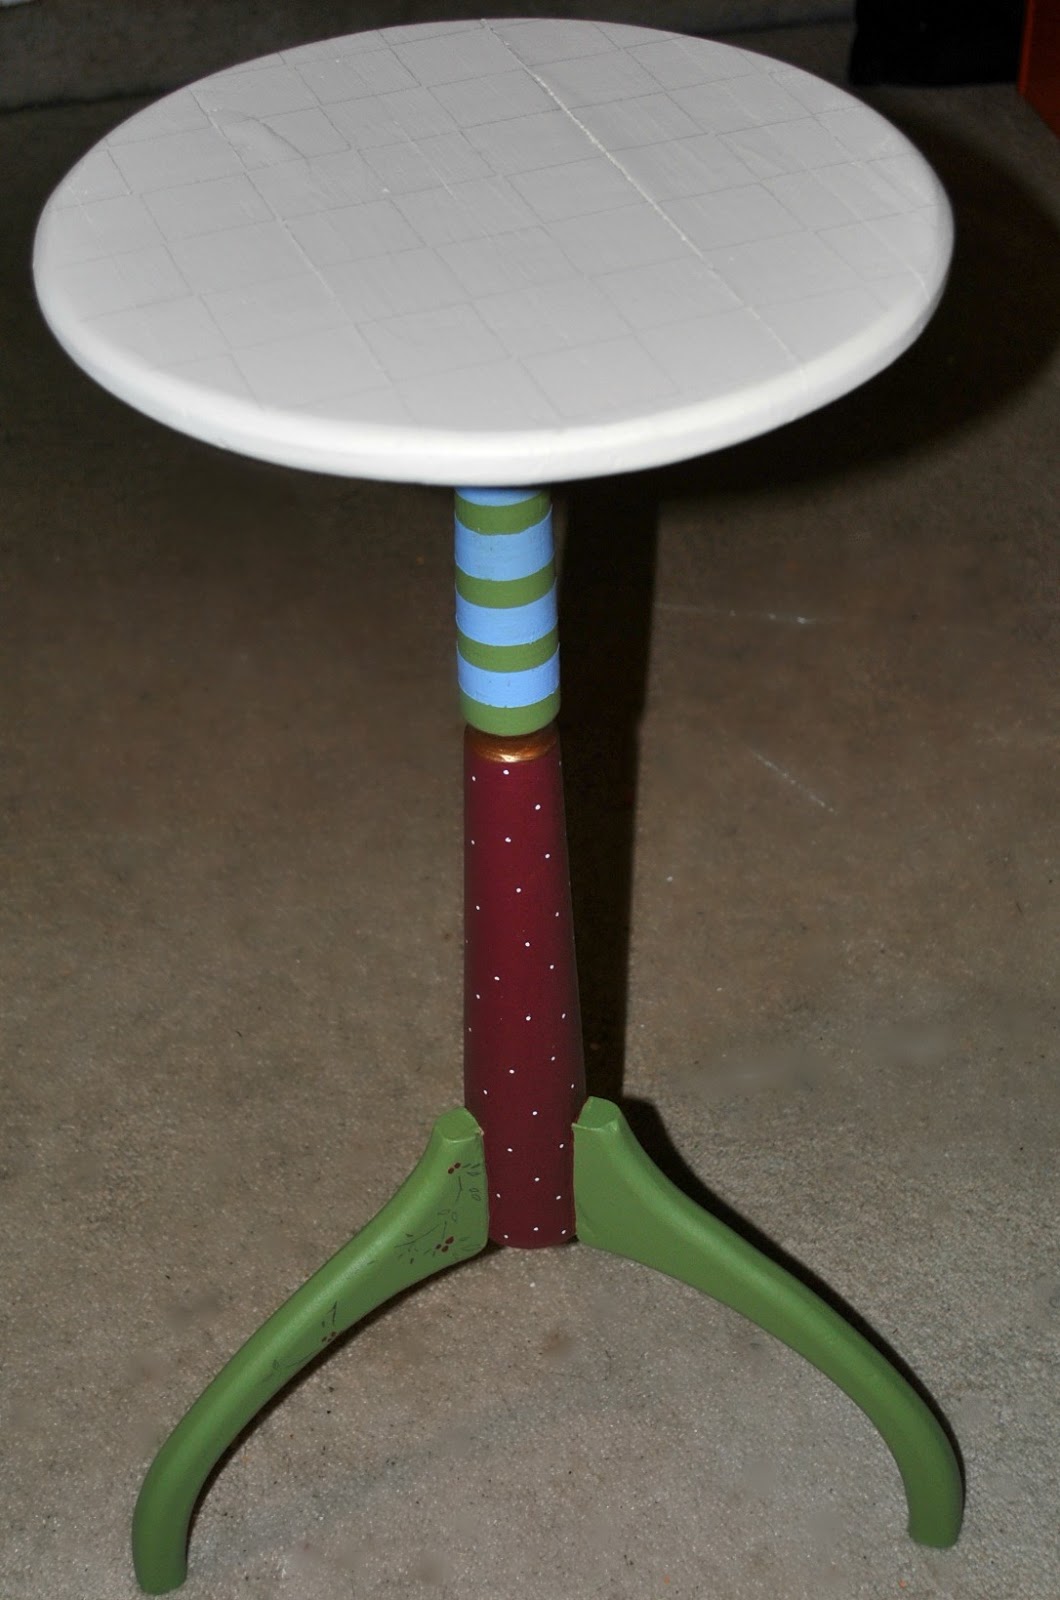

This fantastic lady wanted courtly checks, just like that famous black and white check designer we all know and love! Well, to be honest, I had never duplicated MKC’s black and white courtly checks.  Sure, we've all done black and white checks, but just like MKC? I was nervous, but I never shy away from a painting challenge. So, I said sure, I’ll do it.  She had several other pieces at home that she wanted to match this little plant stand too.

This is how I did it, if it helps great! First, I painted my base coat in a cream color, then I mapped out my squares.


Once the base coat was dry I colored in the alternating squares with one coat of black.  While the black was still wet I poured my blue and gold paints into a small container (I probably poured way too much in, I tend to do that, but you only need a dime size) remember you’re only using a tiny bit.  You’re trying to create the streak; you’re not full on painting.


So, with a dry brush dip your end in a little bit of blue and gold. 


Then streak it through the black paint.


Now, what you don’t want to do is try and keep streaking it, because then you just get a green square, like this.  


Easily corrected though, just go back in with a little more black to cover it up.  Again, the trick is not to use too much paint and have your streaks go in the same direction on every black square.


Then go into the white/cream squares and drag a little gold going in the opposite direction of the streak in the black square. You don’t have to do every square, sometimes less is more.

When finished your top should look like this. I must give some credit to my friend Lucy from Lucy Designs, who shared some of her techniques with me too.  See ya'll, share the love!


To fancy it up a bit and make it more MKCish, I decided to paint a finial and some small wooden balls to add to this piece.  I always feel like a good finial adds whimsy. 


This is the final product. 


      Have a wonderful 2013! I’ll be seeing you soon with even more inspiration and tutorials.  If there’s something you’d like to see shoot me an email and let me know-I’ll try really hard to put it up!  

And hey, while you're waiting for the next post why not follow me here at my other spots! Pinterest, FaceBook or Twitter

Thanks again for all your kind words and accolades, they really make my day!  Much love and peace friends! Let this New Year ROCK!

Happy Painting, Mary


Friday

2011 in Review: Our Top 5

As 2011 comes to a close, I thought I’d jump on the “year in review” band wagon and give you a look at my top 5, “most viewed” entries for the year.


Number 5:  Garage Sale Loving


I took this fun little piece and transformed it into a funky entryway table. It sold this summer at The Syracuse Arts & Crafts Festival.  It was the first time I had attempted a landscape motif on a piece and I must admit this turned out to be one of my favorites!


My friend Krissy will be glad to know that her daughter’s dresser made the cut!  This piece is actually one of the highest “repined” items on my Pinterest page-it shows up all over-and for that I am honored! I’m hoping I will have the opportunity to get to some larger pieces again this year!


I've had a lot of people affectionately call this my “Toy Story” table, and you know what, I like it! If my babies were still little, this would proudly be displayed in their room, but alas they are teenagers, dark & Gothic, teenagers, gone are the days of Toy Story and bright colors.  Even so, I personally L-O-V-E this table and its primary color pallet, cow print meets floral...it just ROCKS!


Great piece, but boy, was my hand tired from painting in all those zebra prints on the back! Perhaps that’s what prompted my carpal tunnel surgery this November? Hmmm…

I really liked the blue on blue and the red on red (I did a linen weave faux on the top, which didn’t come out all that great in the picture, but looked really cool in person) then did a gold metallic Polk-a- dot on top-SWEET! Then the feet...Shut the front door! They were fencing post toppers-love it! Sold this piece to the same person who bought number 5! Ya baby!


Funny how the number one, most viewed post on my blog for 2011 isn't even furniture! BUT STAIRS!  

As many of you know The Decorative Paintbrush is a 2nd business for me. Although this year, and hopefully in 2012, it will become more of a full-time career for me. My partner and I own another business called 2 Women and a Paintbrush We do all kinds of painting in & out of people’s homes-as a matter of fact, if you've ever read my bio, you’d know it’s really how TheDPB was born.  
Anyway, we were commissioned to paint & stencil a customer’s stairs, and although we have a blog for 2Women and a Paintbrush because I loved how these looked I wanted to share them here as well! I’m so glad I did because it turned out to be the most highly viewed post on my blog since we started in 2009! Too funny, hugh?

Well, I hope you all have a wonderful, safe & happy New Year! Thanks for being a part of my world this year! Your comments are always so uplifting and inspiring! Can’t wait to get painting again-lots of great stuff on tap for 2012! Remember to come follow along on FacebookPinterest or Twitter
Be safe! Big hugs & much love! PEACE!


Wednesday

A Hand Painted Rocking Chair

When I was a little girl I had a very small rocking chair that had a tiny music box on the back.  Every night when I would get out of the tub my mother would wrap me in a big towel, twist the music box on the back and I would rock to Frère Jacques until I was dry. 

It was the first thing I thought of when I saw these chairs from Judy. She had saved them from when her kids where little (the smaller one was actually her husband’s). She wanted them re-painted to match her new grandchildren’s bedrooms.


The smaller one had a music box on it too, but it had long stopped working, so it had to be removed. We patched the holes, sanded some chipping and primed the entire piece.


She wanted to have it match the wallpaper border that they were hanging in the room.  I loved the monkey, so I chose him for the focal point. I used transfer paper to lay down a basic outline then painted it in with the colors that matched the border.


Then I put the funky alligator on the back.


I also added 3 circle appliqués to the head rest just to bring in some color.


Then tricked out the runners with checks and polka dots.


On the next chair we had to remove an old laminated plastic cover that had been tacked on with thumb tacks. Then we primed it. 

Painting the tiny rings took FOREVER….ARGH!!!!! I was going to rip my hair out! Especially with navy blue on white! I left the seat plain because she was making a cushion and pillow for the back of the chair out of fabric that matched the paint.


Well, besides these custom orders we were busy getting ready for Plowshares, which was amazing by the way! Not only did we see great (old) friends but made some new ones as well! Plus, we sold a lot of "stuff" and came away with even more custom orders!


But what really has been mind blowing is our online store! Our Etsy store has been off the charts! If you've never checked out our store, please do so!  About a month ago I said to Maggie, "I might take the jewelry boxes out of the shop, because I'm not sure they're selling as good as I'd hoped."  All of a sudden, as if someone had heard me, orders came pouring in! I just mailed out the last one yesterday, just in time for Christmas!-FEW!


As I wrap up 2011, I want to thank you so much for all your support this past year! For reading this blog, for your wonderful comments (you always give this chic a much needed ego boost!) and especially for inspiring me! I follow many of you and find great inspiration on your blogs as well! Have a fantastic holiday and here’s to a rocking, prosperous, CREATIVE, New Year! Oh yeah, that's a wine glass clinging in the back ground-cheers-baby!


Sharing with my many friends on my party page!


Tuesday

The Funky Chicken

It isn’t often that you can say you love your neighbors, but I do, and the reason I love them is because...they throw away some pretty cool stuff! When I first started curb shopping I usually went at night. I was kind of embarrassed and didn’t want my neighbors to know I was taking their things, but now a days, I actually have people stopping me and saying, “Are you that furniture lady? (Like I’m some crazy cat lady that lives on the end of the street) I’ve got a dresser you can have!” People ask if their table will make our blog, or what we’ll do with this chair, they have even helped me move larger pieces to my storage unit! How awesome is that! I'm like a rockstar on my street, lol! Either that, or people just think I'm plain nuts! I'd like to think the first, but I'm guessing the second.
This, is one of those pieces. I scooped it up from 5 houses down, it was a total score! One night after picking my daughter up from work I spotted it. “If it’s still there when I come back (I was running late as usual) I’ll grab it.” Sure enough there it was. We opened the van door, pulled it in, slammed the door, and squealed off. No one was the wiser and we we're one step richer! When I got a good home I took a good look at it. I knew immediately it was going to have funky chickens on it, I mean how could it not, right! It reminds me of a chicken coop.
But first, I had to do the boring stuff…I removed all the hardware, primed it and sanded it, BORING! Even though the majority of it was going to be white again, I knew being a used piece I better prime it just in case.

I removed the wire from the doors because I wanted to clean up the build-up of paint that had accumulated from years of painting and give it a smoother look, plus I wanted to spray paint the wire black without creating overspray on the door. I popped the staples out with a screw driver, then laid the screens on some card board, and then spray painted them black.


While those were drying, I spray painted the hinges to match. These hinges were really old but I thought a coat of spray paint would bring them back to life. No such luck. They were really crusty looking. I made a mad dash to the hardware store to grab some new ones, but they were out of black ones in the size I needed, so....silver it was (then back to the spray paint). I had to spray paint the screws as well to match. I use a floral Styrofoam square to hold the screws and spray the tops then just touch up with my fingertip after I screw them in (if necessary).


Once I sanded the doors down, primed and painted them I reattached the hardware, plus some really cute knobs from Hobby Lobby (50% off 1.29 apiece).


So, now for the fun part! The funky chickens! I use this great paper to trace my pictures when I want the same thing over and over again. Its awesome stuff and very easy to use. You lay it down (dark side on the bottom) lay your picture on top, trace over the top of your picture with a pencil our any dull object, then peel it back, and voila! Then just color it in. The lines are erasable and do not show through the paint (only sometimes through light colors, like pencil would). You can even use this paper on dark colors.


I then used some really high tech stencils for the flowers on the back. Notice the leaves? They're paint chip samples from Home Depot, but they make great leaf patterns don’t they?


Somehow, I wanted to incorporate a fun basket of eggs into this chicken coop, but I just wasn’t sure how, when this quirky little idea popped into my head one night.


I was lucky to find this bowl set at the local Rescue Mission Store for $3.00 (“Winning!” I could use the one bowl for the piece and sell the other bowls at our next craft show).


Picked up 2 packs of wooden eggs, painted them in wild tricked out colors and patterns, slapped them in the painted bowl, glued them to the top and called it a day! Yaya! Who’s your daddy?

After I did the final photo shoot I did add wheels to the bottom of this piece and magnet strips to the inside of doors (the kind you see on the insides of your cupboards) to keep them from closing in on themselves.

This piece will be going with us to the Syracuse Arts and Crafts Festival in July. I'm hoping somebody finds it as amusing as I do! Hahahaha!


Happy Painting!
Mary


I will be sharing with my friends @:

The rest of my friends can be found on my "link page" at the top of this page :D