Showing posts with label black and white checks. Show all posts

Friday

The Long Awaited Table


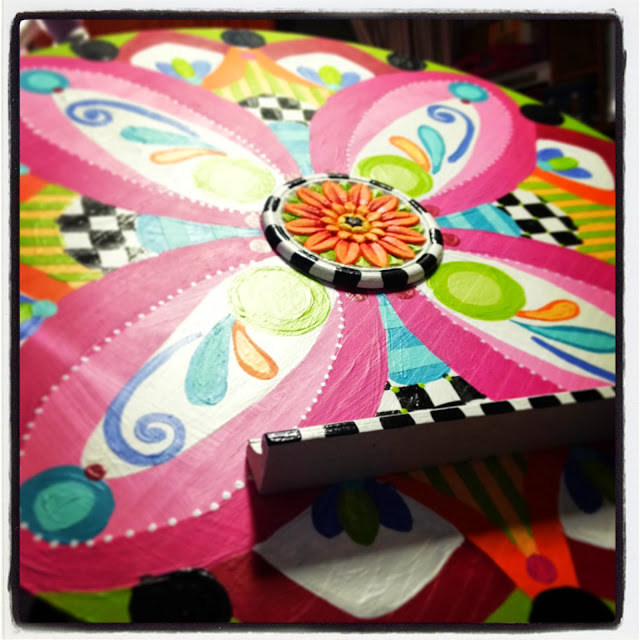
This table was so much fun to do! From the moment I saw it I knew I'd love painting it. This was actually the second table, in a couple of tables they had given me, and although a bit more labor intensive then the first, I didn't care because the end result was pretty cool.

The first one I did for them was a smaller table. Per their request I used the same color palette.
  The Miniature Table For Two was an easier transformation compared to its larger counterpart


But I was certainly up for the challenge.  This table had great character and I was looking forward to  expanding on it.  


After priming it two times  I actually took it apart to start the painting process. 

I started with the base first then graduated to the top. 


When I first started I THOUGHT  I knew exactly what I wanted to do on the top, that was until I painted the base. It was then that I realized it was taking me in a completely different direction. This, crazy as it sounds, is when a piece just tells ME how it wants to be painted.

As I started painting the top Graphics Fairy came to mind. 

This website is a virtual GOLDMINE for anyone looking for free, really cool, clip art.  I could spend hours looking around there and find tons of inspirational graphics for furniture I was doing now and future pieces I had yet to conquer.  This is how I knew I wanted to put a vintage label on this piece, because while on the website researching another table awhile back, I came across this label.  


Once I printed it out on plain regular printer paper I used a projector to transfer the item to the top. I then used a white colored pencil to trace it out and a black Deco Art pen to color it in.  I then outlined the swirls in a gold metallic pen because I felt it added a bit of interest and contrast to the black and burgundy. 


When I had originally painted the top, I had painted the entire thing burgundy, but in the end changed my mind and opted for the infamous quarterly checks instead. I guess I wanted the sides to be different from the rest of the table, because when the sides were down I wanted the eyes to move all over the piece, instead of them just blending in. 


I was really pleased with how it turned out.  I think Mike & Joann will be too.


Just a quick note, I have recently joined the team of PaintNite Syracuse 


And will start instructing events in April!  I can't wait to share my passion of painting with others.  It's a very unique opportunity and I look forward to seeing some familiar faces out there in the audience.  You don't have to have creative bone in your body! So I don't want to hear any excuses! All you need is an open mind and willingness to have fun. I guarantee you will walk out with a fabulous picture to hang in your home and a lot of fun memories.  And I'll warn you now,  once you do one, you'll want to do it again, and again, it's that much fun!

Remember to


Thanks for stopping in!  
Join us on Facebook for current updates, Pinterest for inspirational boards, or Instagram for wonderful photos and more!





Monday

Grandma's Table: Stephanie's Remake

This is just a quick post on a recent redo I finally finished.  I forgot to take before pictures which KILLS me but I still wanted to share the end result with you.


We are moving into a new, larger studio, which has been so exciting and yet a tad bit overwhelming!  Who knew I had so much stuff.  Our house will finally be our home again and I can't wait.  We are moving into the Delavan Center in Downtown Syracuse.  


I have been taking a lot of pictures and can't wait to share the final reveal with my peeps!

In the mean time please come play with us on Pinterest or keep updated on Face Book!


Saturday

A Jazzed-Up Speaker's Podium


 Laura had seen me at the Syracuse Arts & Crafts Festival  and wrote  me a few weeks later to ask me about a really cool idea she had.

Laura is a high school English teacher and had a vision of creating a special space where her students could read their papers/speeches from.

She had gone online to price out a few stands and soon discovered that they were a lot of money for just wood.  Nothing stood out to her as unique or fun, so she thought perhaps we could build her something.  She has seen pictures of our dog food storage boxes and thought perhaps we could build something for her classroom.

With notebook & camera in hand we went to Home Depot to do some brainstorming.  After laying out many different projects/ideas in the isles, our design really started to take shape when we saw this column.  I wrote her with our final thoughts that night and by the next day we were back at the store finalizing our plan.

These were the items we left with.


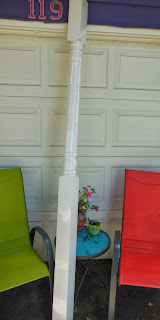
We purchased the decorative colonial house beam first.  I loved the scoops and loops, rings and things and figured I could do a lot with it.  More so than just the fence beams we had originally thought of, and much more feminine that just building a box.  We knew we'd have to cut off a lot to make it the correct size but even with that, it still had more to offer design wise.


We then found these great pre-cut circles for only $5 a piece! What?! Can you say Jackpot! 

We also purchased L brackets, and bookshelf brackets to cover the L brackets after we connected the post to the base.

We also knew because the top circle would be at an angle there would need to be something that would keep the paper from sliding off.  We had tried a variety of trim pieces, but nothing seemed to go.  Then I had an epiphany-yes, right there in Home Depot!  I would use a Scrabble letter holder! Perfect, right?!


We measured the height and then made our cuts.


Then we secured the post to the base.


Then attached the pre painted shelf brackets to hide the hardware.

We then needed to attach the top.  Now, because this was going to be used by teenagers we knew we'd have to secure it pretty darn good. Which meant we'd have to screw it into the post as well as glue it.

The thing was I wasn't trilled with the idea of having screws in the center of my art piece and I wasn't excited about the prospect of covering them up with wood putty either.  There had to be something more...decorative.


Then I found these!  For just $2 at AC Moore I found my answer.  I would screw the disk into the post then cover it up with this applique-BEAUTIFUL!


After the center piece was secure, I then glued on the Scrabble letter holder and held it in place with painter's tape until it was dry.


I finished painting the piece and added Laura's chosen quote to the front.

"Go into the world and do well. But more importantly go into the world and do good."

This was the final piece. Front and back.


This was the first project we'd ever done like this and I have to say I was pretty pleased with the end result.  I'm hoping her students will love reading from it and perhaps it may take their minds off, if only for a minute, of the terrifying task of public speaking.

Here are the next two pieces on deck.  Can't wait to get started on them!


Sharing with these crafty blogs:


Friday

And A Bookcase Makes Six

A couple weeks ago I showed you a bedroom set that I had done for a customer who wanted "Indy" style elephants, certain quotes & an infinity symbol on everything.  You can see that post here so take a peek.


So, today I bring you the last piece of this set, the bookcase.  Like the other pieces it had to have an Indy feel, as well as match the other pieces (obviously, lol).


 I started with a base coat on the sides with Chinaberry from Benjamin Moore.  I had marked off the squares I was going to paint white first, with my new favorite tape from Frog: Delicate Surface.  It really is great because it doesn't pull the paint ,even if it's freshly dry.


After I pulled the squares off I taped off the outer edges. I know to some it may seem like I'm doing this backwards, like I should have fully painted everything first and then just squared of the areas that would be painted white??? BUT, I didn't? Not sure why, but roll with me here...


Then I taped off for the stripes.  I use one stripe as a marker, so that the stripes are even.


When the stripes are laid out I use this little trick to help with "bleeding".  I paint along the edges with the base color.


 I needed to pick a color that coordinated with it, so I rubbed a couple colors on a card to see how the other chosen pinks worked with the Chinaberry.  When nothing really tickled my fancy I went to the bored. 


 Now, before you judge me, you must know, I have A LOT of paint, and in order to keep things organized I've developed this color chart.  Then I have a shelf with every color family on it that coordinates with the chart.  Okay, can you say OCD? A little, but when I need a quick color, I don't want to go diving into the paint closet, I want a quick look, hence the color chart.


I went to the pinks and chose Dinner Party.  A sort of Maroony, brickish color, a deeper contrast to the Chinaberry.  After the stripes were set I got to painting the other sections and this was the final product.


Now I am on to my next project.  Can you figure out what we are going to build?


And last Friday I had some surgery and I was told to have bed rest for at least a week (Man, was that a hard thing!  Not gonna lie, I snuck down to the studio a couple days to paint, but don't tell my doctor).  Well on bed rest, besides pinning my heart out on Pinterest (I just hit 10,000 followers! Yeah me!) I have been doing a lot of crazy reading!  Here are a few books I loved:


I'm going to start making some paper masks and have been devouring books on paper mache.


Have you been reading anything good lately that's creatively inspiring you lately?  Please come over to my FaceBook Page and share!  I'm a big reader and LOVE a good book!