Showing posts with label personalized furniture. Show all posts

Sunday

Personalized Gifts For You


Christmas season is the busiest time of year for me.  I love all the unique gifts that people come up with; original, personalized gifts, for family and friends.  My friend Eva asked me to create a couple of just such items.  


This style table is one I have readily available. As a matter of fact I have created a couple different designs on this very surface.  Here's a couple of past posts


She had seen this particular table 


and had asked if I could possibly do it in purples and greens. Being the accommodating lady that I am I said, "Yes!"  So, this was her first table:


Maybe, you recognized this faux from this recent post?  I used the same greens in this armoire to                             create a mossy styled faux for the backdrop of this flowered cat.


Her second table was for her daughter's boyfriend who was an avid Boy Scout.  She sent me their emblem and asked if i could recreate it on a table.  Being the accommodating lady that I am, I said....yep, you got it, "Yes!"


I hope y'all get/got some pretty creative and interesting gifts this holiday season!  

Stop on over to our Etsy Shop and see all the wonderful new items we have. I encourage you to bookmark our page and come back to create your own personalized gifts at some point in time. We are adding new things all the time. 

Or stop by our Pinterest page or Instagram for some creative inspiration.  


MERRY CHRISTMAS!!!!!!


Friday

Hippie Love: Peace, Love & Dreaming


This desk sooooo needed a revival! Press board, generic, some assembly required...ya, you know the deal.  We've all had a desk like this at one point in time, so don't judge, lol!

This is the first piece of 6 that I am redoing for a customer, four of which are set to be  personally designed for her children-this desk being one of them.  The criteria for this piece.
  • Include the quote, "Forever and ever and always and always
  • The little girl is 9 so, fun, funky and bright!
  • Have it match her bedspread, in regards to color
Pretty simple, right?  She was very cool in giving me free range-LOVE THAT!  SO, I seized the opportunity (or in my case, paintbrush) and ran with it, wildly I might add (which has happened before hence the spilled paint in the next picture).


As always, I started with primer.  I know, you're asking yourself, "Mary, did you get any primer on the piece or is it just on the floor?"  "Well..." I would sheepishly reply, "Yes and no." 


As you can see I have cans of paint all over the place. Which is funny considering my last post was all about how "OCD" I am about my paints, but in my defense I often work on a couple of pieces at once. When I do, I leave the the colors out for easy access. 

Some days it's like I'm maneuvering through an obstacle course!  (Can I get an AMEN if you feel me!) So once, no maybe twice, okay, five times so far, I have tripped over cans and spilled the entire contents on to the floor. Have you ever spilled paint?  Your world suddenly goes into slow-mo. Like when you lock your keys in the car, shut the door and suddenly realized the keys are in the ignition??? Ya, that kinda slow-mo. You quickly scoop up the can, but can only watch as the paint s-l-o-w-l-y oozes everywhere! 

It was too big of a mess for Bounty, so, I put a fan on it and let it dry!  Now, I have large rubbery spots of crazy color all over my studio carpet.  I can hear the cringing from here, but no worries, it was a crappy carpet anyway.

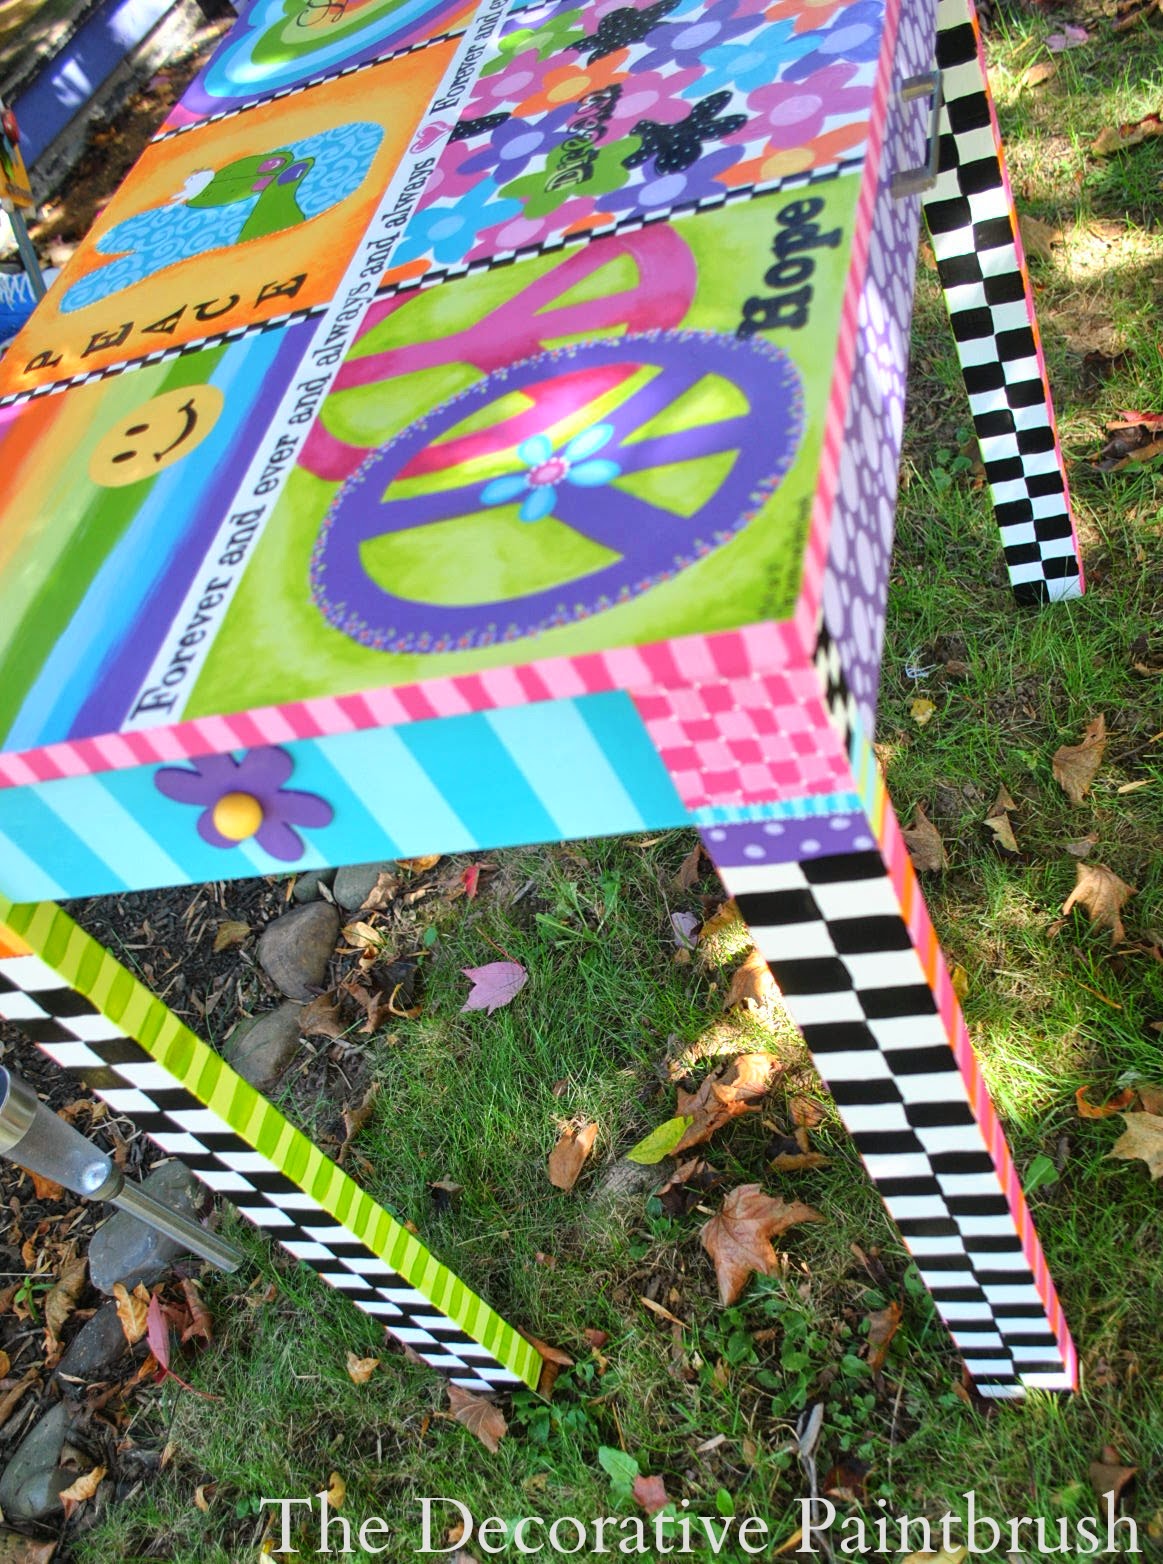
After my piece was fully primed it was time to lay out the design.  I wasn't sure at first that I wanted to break the top into 6 separate sections, but as I starred at the blank, white "canvas" (which can be the most intimidating part of an art project) I just decided to go with a hippie"esq" theme.


One of the corners would be a rainbow background and to do that I had to blend the colors while they were still wet.  I didn't just want a block of color I wanted the stripes to fade into each other like a real rainbow.


After I laid down the base colors in each section, I went back into each square and put in more details.


Right down the center I ran the quote, "Forever and ever and always and always".  A sentiment her and her daughter share with each other often. I wanted it to be the focal point of the piece.


Each block has its own word; Laugh, Peace, Love, Hope, Dream & Family.  I felt that even though each square was a separate piece of art work, putting a word in each box would bring the pieces together, as well as stress the important things in life. 

AND....hippie drum roll please....This was the final piece.  

And YES, my hands are totally cramped from painting all those small little circles on the drawer and ALLLLLLL the black and white checks on the legs!  BUT, it was so worth it!  I'm thinking this 9 year old will have no problem doing her homework on this stylishly funky desk.  
What do you think? 


Now, I am off to start her next piece!  This beautifully antique chair that was made by her grandfather.  How awesome are the hand carved crowns and the raw carvings in the center of each one!  Beautiful. This will be transformed with whites, tans and various shades of pinks. A very soft & feminine piece.

 Stay tuned!


Again, ignore the paint on the floor, Hahahaha!


Monday

Jenny's Jewelry Box Makeover


You'll hear me say this over and over again...I LOVE TAKING SOMETHING OLD AND MAKING IT NEW AGAIN!  Like, it's an addiction for me.  When I first started painting furniture I used to plan, draw things out, create different color combinations, blah, blah, blah! But as my business grew time became short, so I just started to "wing it" and the results have, for the most part, been pretty cool.  Now, that's not saying I haven't switched up mid way through a design, just because something didn't sit right with me, but for the most part the "freedom to create" mentality has been working pretty well for me.  Especially, when a flexible, open minded person gives me "free range" OH, HOW I ADORE THOSE PEOPLE!  Case and point; Jenny's Jewelry Box!


I had done other work for Jenny (see her owl mirror here) and she had mentioned she had a jewelry box that she wanted to have redone.  "Well, absolutely! Bring it over!" I said.  Always up for a challenge!  I actuallly had never "done or redone" a jewelry box of this size before!  I have done a million smaller ones but never one this large and when she plopped it down in my foyer, I thought, hmmmm...what a fabulous piece.  The thing was though, I felt limited in my design because of the "Greek Styled" scalloped top and pillars.  So, I had to think about my approach for awhile.


This was the space that it was going in.  So, I knew the colors had to be a bit deeper and more richer than the pieces I usually do.  It was time to grow up a bit.  I loved the the leather and iron fixtures and furniture, so I knew those had to be incorporated some how. BUT I do know Jenny too, and I knew it had to be playful and fun as well.  


I decided to go with a "faux" leather look (see the tutorial here) on the pillars and legs.  Then brought in the "iron" look by spraying the hardware black.


The playfulness is found in the Cheetah print on the side and the decorative elements through out.


  The really cool thing about this jewelry box too, is all the hidden surfaces, things you don't necessarily see right away.


My most favorite part of this piece, the one that just kind of evolved, was the top.  I wanted to personalize it, like I do my smaller jewelry boxes but yet, I wanted it to be more sophisticated, so I chose her initials  and then built my design around that.


There you have it!  


How do you tackle your "redo" projects?  Do you just wing it or do you plan it out?  Do you choose colors first, or just let it evolve?  I'd love to hear your ideas!  Write me here or leave a comment on our Face Book page!


The Celtic Knot


This is a quickie, but I felt that the story behind it needed to be shared.  I was recently contacted by a friend who wanted to buy something special to commemorate a transition that her dear friend had recently gone through. 

We all hit rough spots in our lives, and with the love and support of her two girls, this woman displayed an unexpected strength that made an impact on those around her.

My friend and the girls got together, picked out the colors, the quotes and gave me free range in the design.  The result was this table.


I am deeply honored that I could create a keepsake for them. One that would show their love for one another and display the strength of their family unit.  Thank you to Marsha for always keeping me busy with such creative and inspirational projects!


This table is one I always have in stock


 I sell a lot of them through my Etsy shop. Wecan create them to fit any room, any decor. Please, check out all the different ways this table can be transformed. These are just some from past blog posts! Halloween Table, Adirondack Table, Art Nouveau Table, Leopard & Pink Table, CollegeTable, The Black & Blue TableSnoopy Table